Difference between revisions of "Changing Your Shirt Design"
(→Replacing An Existing T-Shirt Design) |
m |
||
| (6 intermediate revisions by 3 users not shown) | |||
| Line 3: | Line 3: | ||
Note: this is easier than adding a new design, which is not covered here. | Note: this is easier than adding a new design, which is not covered here. | ||
| − | + | =Preparations= | |
'''CAUTION!''' You will be modifying the original GlobalClothing | '''CAUTION!''' You will be modifying the original GlobalClothing | ||
| Line 14: | Line 14: | ||
* [http://share.hoikas.com/prpex/rv06.zip PRP Explorer v6] (for replacing the textures) | * [http://share.hoikas.com/prpex/rv06.zip PRP Explorer v6] (for replacing the textures) | ||
| + | * [http://www.microsoft.com/downloads/details.aspx?FamilyID=519aae99-b701-4ca1-8495-39ddde9d7030&DisplayLang=en DirectX SDK] (required for PRP Explorer) | ||
* [[PlasmaShop]] (for re-computing the GlobalClothing age's sum file) | * [[PlasmaShop]] (for re-computing the GlobalClothing age's sum file) | ||
| − | + | =Creating Your Own T-Shirt Textures= | |
''TO DO: describe how to do this'' | ''TO DO: describe how to do this'' | ||
| Line 26: | Line 27: | ||
* m08shirt_tintmask.dds (the mask that tells URU which portions of the shirt can change color) | * m08shirt_tintmask.dds (the mask that tells URU which portions of the shirt can change color) | ||
| − | + | (To change these textures to your own, open these with Paint.Net, and after changing them, save as "Direct Draw Surface (DDS) (*.dds)", and in Settings Choose "DXT1", "Cluster Fit", "Perceptual", and check "Generate Mip Maps". When you save it, the filesize should be the exact same as the original.) ("m08shirt_tintmask.dds" actually uses DXT5, but you shouldn't need to change that file.) | |
| + | |||
| + | =Replacing An Existing T-Shirt Design= | ||
We are going to replace the Riven long T-shirt design for this tutorial. | We are going to replace the Riven long T-shirt design for this tutorial. | ||
| − | * Start PRP Explorer | + | * Start [[Free_and_useful_tools_to_help_in_Age_writing#PRP_Tools|PRP Explorer v0.6]]. |
** If it asks you whether you want to unpack and decompyle your Python files, click "No". | ** If it asks you whether you want to unpack and decompyle your Python files, click "No". | ||
* In the list of ages on the left, locate the GlobalClothing age and click on the "+" next to it. You will see a list of the age's "pages" (or PRP files). | * In the list of ages on the left, locate the GlobalClothing age and click on the "+" next to it. You will see a list of the age's "pages" (or PRP files). | ||
| Line 68: | Line 71: | ||
[[Image:tshirt_10.png]] | [[Image:tshirt_10.png]] | ||
| + | |||
| + | [[Category:Tutorials]] | ||
Latest revision as of 06:24, 14 April 2011
This tutorial will teach you how to replace an existing long T-shirt design with your own custom design.
Note: this is easier than adding a new design, which is not covered here.
Preparations
CAUTION!  You will be modifying the original GlobalClothing
age files.  If you make a mistake during this tutorial, you may
corrupt the game files, preventing URU from running.  So, MAKE
A BACKUP OF YOUR URU FOLDER! (At the very least, make a copy of
all the GlobalClothing* files within your URU's "dat" folder.)
Next, you will need to download and install the following software:
- PRP Explorer v6 (for replacing the textures)
- DirectX SDK (required for PRP Explorer)
- PlasmaShop (for re-computing the GlobalClothing age's sum file)
Creating Your Own T-Shirt Textures
TO DO: describe how to do this
For now, you can use the Mysterium 2008 T-shirt textures found in this zip file (Mysterium08ShirtTextures.zip) for the next step:
- icon_m08shirt.dds (the T-shirt icon that appears in your closet)
- m08shirt.dds (the T-shirt texture)
- m08shirt_tintmask.dds (the mask that tells URU which portions of the shirt can change color)
(To change these textures to your own, open these with Paint.Net, and after changing them, save as "Direct Draw Surface (DDS) (*.dds)", and in Settings Choose "DXT1", "Cluster Fit", "Perceptual", and check "Generate Mip Maps". When you save it, the filesize should be the exact same as the original.) ("m08shirt_tintmask.dds" actually uses DXT5, but you shouldn't need to change that file.)
Replacing An Existing T-Shirt Design
We are going to replace the Riven long T-shirt design for this tutorial.
- Start PRP Explorer v0.6.
- If it asks you whether you want to unpack and decompyle your Python files, click "No".
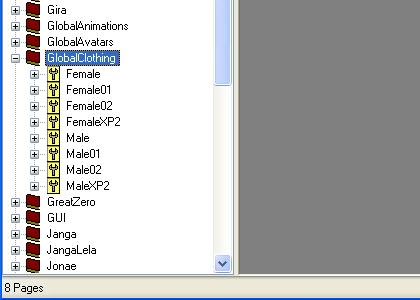
- In the list of ages on the left, locate the GlobalClothing age and click on the "+" next to it. You will see a list of the age's "pages" (or PRP files).
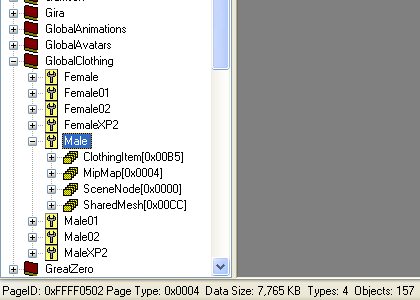
- Locate the "Male" page in the list and click on the "+" next to it. You will see a list of the Male page's object types.
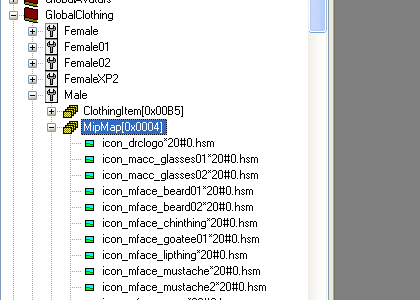
- Locate the "MipMap" object type in the list and click on the "+" next to it. You will see a list of the MipMap objects (i.e. textures). Note: since these textures have long names, you will need to move the divider over to the right until you can see the whole name.
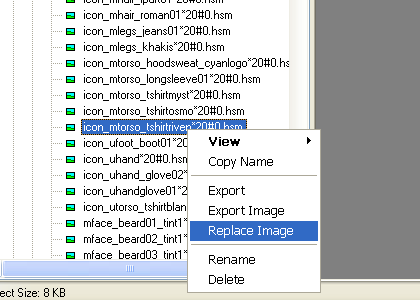
- The first texture that we will replace is the Riven T-shirt icon. Locate the "icon_mtorso_tshirtriven&2A20#0.hsm" texture and right-click on it. On the pop-up menu that appears, choose "Replace Image".
- In the file browser that appears, double-click on your T-shirt icon DDS file (e.g. icon_m08shirt.dds). This will replace the Riven T-shirt icon with yours.
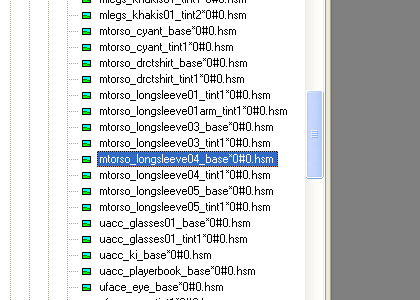
- Next, we'll replace the Riven T-shirt design. Locate the "mtorso_longsleeve04_base&2A0#0.hsm" texture and right-click on it. On the pop-up menu that appears, choose "Replace Image".
- In the file browser that appears, double-click on your T-shirt design DDS file (e.g. m08shirt.dds). This will replace the Riven T-shirt design with yours.
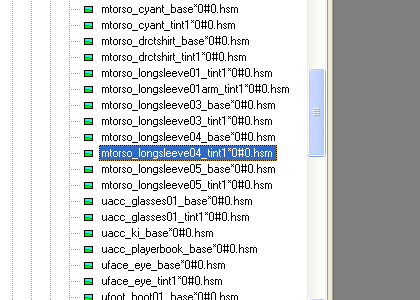
- Finally, we'll replace the Riven T-shirt tint mask. Locate the "mtorso_longsleeve04_tint1&2A0#0.hsm" texture and right-click on it. On the pop-up menu that appears, choose "Replace Image".
- In the file browser that appears, double-click on your T-shirt tint mask DDS file (e.g. m08shirt_tintmask.dds). This will replace the Riven T-shirt tint mask with yours.
- Exit PRP Explorer.
Since we have modified the GlobalClothing pages, we need to recompute the age's checksum. Here are the steps to do this:
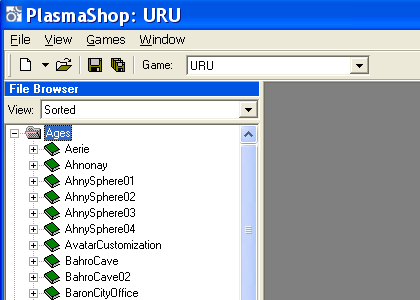
- Start PlasmaShop.
- In the File Browser on the left side that lists the URU folders, locate the "Ages" folder, then click on the "+" to see a list of ages.
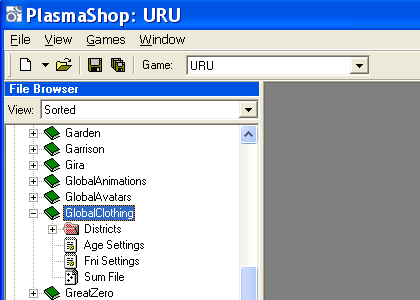
- Locate the GlobalClothing age in the list, then click on the "+" to see a list of age files.
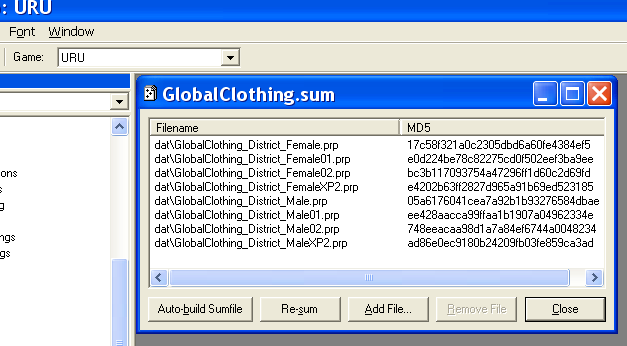
- Locate the "Sum File" in the list, then double-click it to bring up a dialog.
- Click on the "Auto-build Sumfile" button. A "Please Wait" dialog will appear for a few seconds while it recalculates the checksum, then it will disappear.
- Click the Close button on the sum dialog.
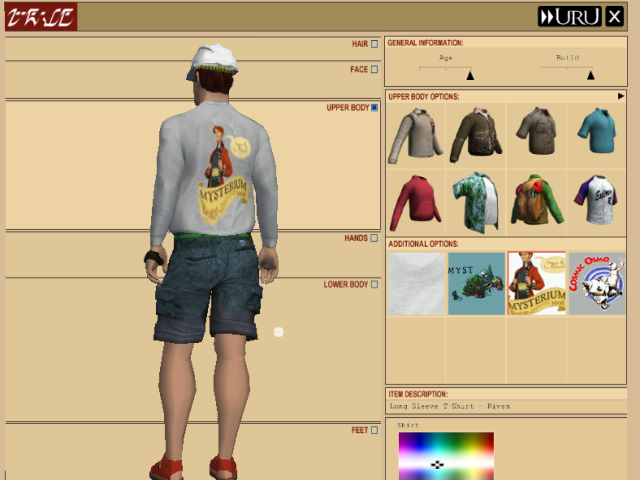
Now you are ready to see your design! You can start URU from within PlasmaShop - just scroll down the list of ages all the way to the bottom and double-click UruExplorer.exe. Once you're in your Relto, go to your closet and select the long T-shirt. You'll see the available designs - and there's your design!

