Difference between revisions of "Making Terrains With Bryce"
(→Creating The Volcano In Bryce) |
|||
| Line 111: | Line 111: | ||
[[Image:bryce_createmaps.jpg]] | [[Image:bryce_createmaps.jpg]] | ||
| − | The export terrain window will pop up showing the mesh to be exported. The slider at the bottom can be moved to increase or decrease the polygons. Too much of an increase will lock the program. Try not to go above 10000 | + | The export terrain window will pop up showing the mesh to be exported. The slider at the bottom can be moved to increase or decrease the polygons. Too much of an increase will lock the program. Try not to go above 10000. |
| − | The exporter will also create texture maps. Diffusion, ambient color, reflection, transparency, and bump components are available. For now, just select | + | The exporter will also create texture maps. Diffusion, ambient color, reflection, transparency, and bump components are available. For now, just select Ambient and de-select the others. |
| − | The size refers to pixel size of the image textures. The format allows for bmp, jpg or other image types. To change each, click on the down arrows and select from the menus. | + | The size refers to pixel size of the image textures. The format allows for bmp, jpg or other image types. It is currently set to "Default". To change each, click on the down arrows and select from the menus. For this example, set the size to 1024x1024 and the format to JPEG->High Quality. |
Once everything is selected, click on the check button on the bottom right of the window. The mesh and images will be generated and the progress bar will appear. Then the window will close and leave you back in the terrain editor again. | Once everything is selected, click on the check button on the bottom right of the window. The mesh and images will be generated and the progress bar will appear. Then the window will close and leave you back in the terrain editor again. | ||
Revision as of 11:03, 22 July 2008
This tutorial was adapted from Electroglyph's excellent journal entry on making a volcano with Bryce.
Contents
Getting Familiar With Bryce
Bryce has an excellent interface for creating all sorts of geometry and applying textures and materials. We're going to use it for creating a terrain to import into Blender, for use in an age. But first, you will need a copy of Bryce.
Installing Bryce
Version 5.5 of Bryce is free; however, it only exports terrains. To obtain Bryce, you'll first need to obtain a free serial number from DAZ 3D (the company that makes Bryce):
Click the link for creating a new DAZ account. You'll need to provide your email address; this will be your account username. You do not have to specify your birthdate, but you do need to specify how you heard about DAZ. I just entered "forums" and clicked the Create Account button.
Next, check your email for a confirmation message from DAZ. Click the link in your email to activate your account. This will then take you to a web page that, after a short pause, will display your Bryce 5.5 serial number. Copy this number and paste it into a text file, then save that file on your desktop. You'll need this when you install Bryce.
To download Bryce 5.5, click on the link below:
Then click on "Download Now". It will take a while (122 MB download size), but at the end you'll have a file named Bryce5_5_Free_Setup.exe.
Double-click this file to start the installation. The setup wizard will appear. Click Next until you get to the software agreement, then click Yes. Then choose your installation directory (or just use the default directory C:\Program Files\DAZ\Bryce 5.5) and click Next.
On the Registration screen, enter your email address as the username, and enter the serial number you saved into a text file on your desktop. Then click Next to begin the installation - finally!
After it writes the files, it then shows a NOTICE dialog, asking you whether to install DAZ Studio 1.0; this is to allow a direct link to DAZ from within Bryce. This isn't really necessary for our purposes, so click on No. Then click Next, then Close - and it is done.
Introduction to Bryce
Double-click the Bryce 5.5. icon on your desktop to begin.
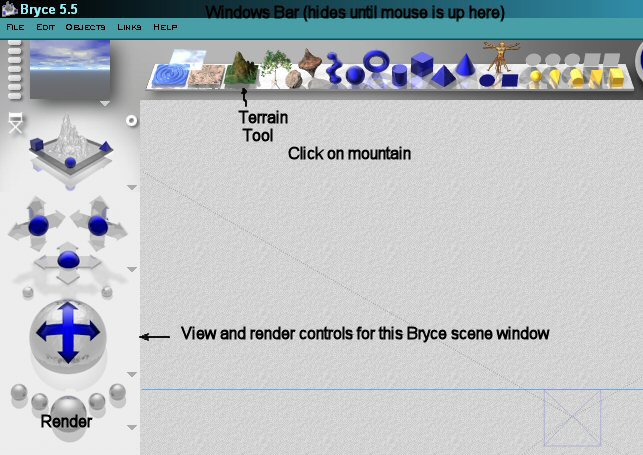
One of the first things you need to know is that the windows bar hides at the top of the screen until you push the mouse up to the top. You will need to do this to file save, print, and exit the program. Many of the controls and menus only appear after you click another button.
The program should open with a blank gray screen and the create menu. The portion of the window that has the create tools is near the top left edge above the gray. The first three objects look like water, clouds, and ground. These create infinite planes with what else, Water Clouds and ground applied. The next button that looks like a mountain creates a terrain. That's the one you want. The next button is the tree lab. These won't export so forget them for now. After that you have the rocks button. It produces 20-30 random rocks. The next button that looks like a top is the lattice button. It makes a double sided terrain. After that you have a set of blue primitives and yellow lights. None of these will export, however, so we might as well move on.
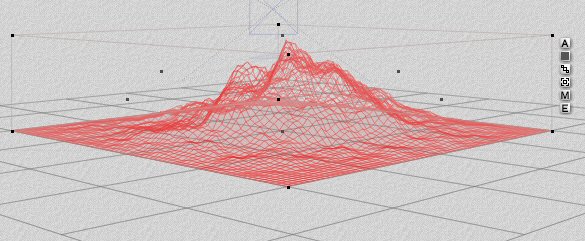
Press the mountain button once. A random mountain is generated in the center of the gray space. This mountain is displayed as a red wireframe because it is the active object. There are a set of squares located to one side. From top to bottom these buttons control Attributes, family, link to parent, track object, materials, and edit. The A (attributes) button has to do with booleans that don't work with this free version, Family changes the wireframe color so you can keep track of lots of wireframes in Bryce. Link to parent and track object are for Bryce animations. The M (materials) we'll deal with in a little while. For now click on the E to open up a whole new window with the terrain editor.
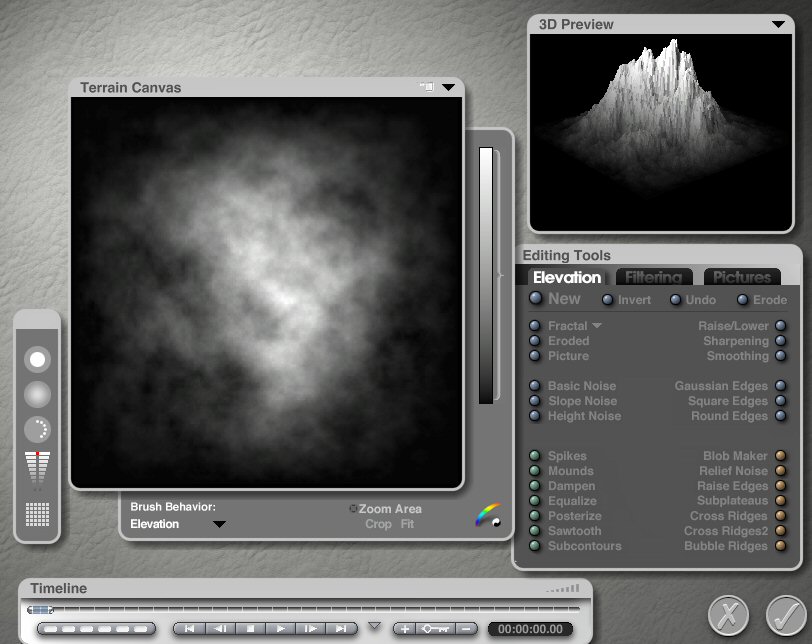
The terrain editor has several windows on it. You can grab each of these by the top and drag it around where you want it. Let's explain the various controls.
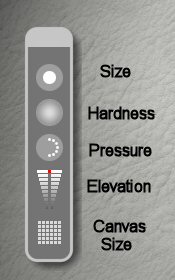
The narrow window farthest to the left is the brush control. It has five buttons on it. The top one is the brush size. Left-click and hold on it and a circle appears on the Terrain Canvas window. Continue holding and drag the mouse to the left or right. The circle will get bigger or smaller to change the brush size.
The next button below that is the hardness. Click hold and drag again and the fade from the center to the edge of the brush changes. You can make a great big dot that is solid from the edge to center or a softer one that is more of a cone.
The next one I describe as brush shape/hardness. Click and drag again and dots appear to show how much pressure the paint effect will have on the canvas. This is useful if you want to create a bowl in the center of your terrain but not completely wipe out hills and valleys.
The next button is brush height. Click hold on the button and move the slider up and down. The top (white) is high. The bottom (black) is low. What you paint on the terrain canvas becomes hills or valleys and also shows up from the side in the 3D Preview window.
The Bottom or grid button determines the number of pixels used to generate terrains. Click on this and a window pops up with choices. The editor starts in the middle around 512 - very fine. This is 512x512 pixels wide. You can go up to 4096 but bigger terrains slow the computer way down.
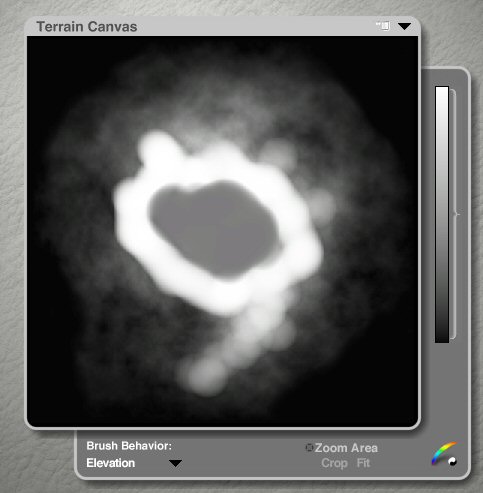
The terrain canvas is the space you draw on to create lands. As mentioned above, white is high and black is low. On the top right edge are two buttons that look like white boxes and a black down arrowhead. The white button makes the background edge of the window appear.
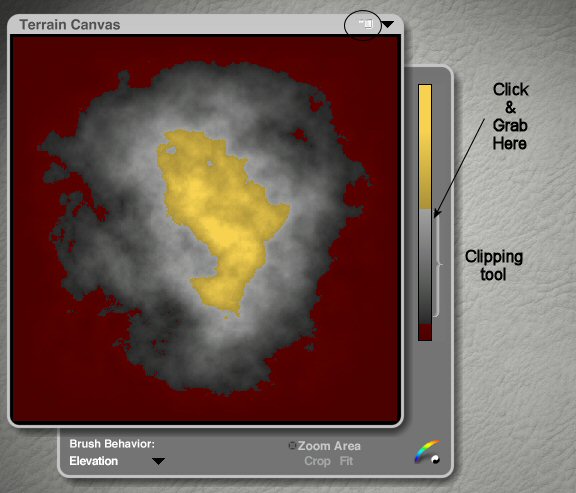
The thing on the right is a clipping bracket. Grab the bottom edge of the bracket next to the bar that shades from white and drag up. The dark parts of the canvas turn red. The square edge of the canvas is clipped off. These clipped parts will not generate meshes. Now you don't have to worry about square bottoms on all your mountains.
Try moving the top edge of the clipping bracket down. The white parts at top turn yellow. This will leave a hole in the top of your mesh.
Click on the down arrowhead. Another pull down menu shows up. The top sets the 3d preview size. You can turn on or off the visible brush the next command is solid. If you turn this on the yellow part you cropped will be capped flat instead of having a hole. This is great for leveling the top of a mountain to put a city on. Smooth keeps the steps between pixels from being jagged. Keep gradient keeps the steps of a step pyramid steppy. Export saves the mesh out to use in another program.
The 3d preview is self explanatory. The timeline works with animations. You can make mountains crumble to the sea in Bryce but that's for another lesson.
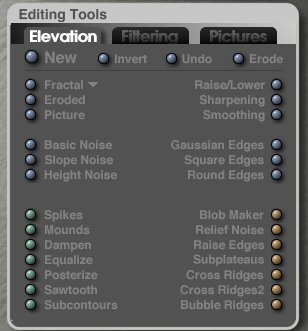
The final window is the editing tools. This is really powerful and very complicated. The best way to learn is just try clicking things. This tutorial will cover several key things. You have three tabs at top, elevation, filtering, and pictures.
Elevation has lots of buttons that change the image in the terrain canvas. The most important is the fractal button. It has another down arrowhead beside it. Click this and you will see a large menu with different names like mud cracks, zorch, lava, alpine hills, etc. Click on a name and the menu disappears. Click on the gray ball to the left of fractal and a new land appears in the terrain canvas. Click again and the same type of land but with different features and scaling appears randomly. Just keep pressing till you see something you like.
Filtering changes the slopes around objects. Just try it and see what it does.
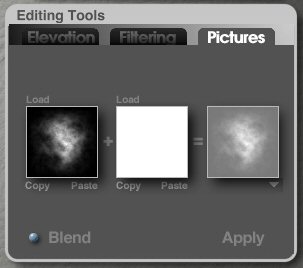
The last tab is pictures. You can draw in other programs such as paint and import them into the editor. Pictures need to be grayscale and some multiple like 512 pixels. If you use an 8 bit image the result will have steps. Stay with tiff or other high res format instead of jpg. If you want a terrain that follows a planned slope you can load a simple picture in the second window to combine the two. Click hold and drag the blend ball left and right to control how strong pictures blend. Default is 50/50 and you can go anywhere to either extreme.
Example: Making a Volcano
Now that you are familiar with Bryce, follow the steps below to create a volcano, export it into OBJ format, and import it into your age.
Creating The Volcano In Bryce
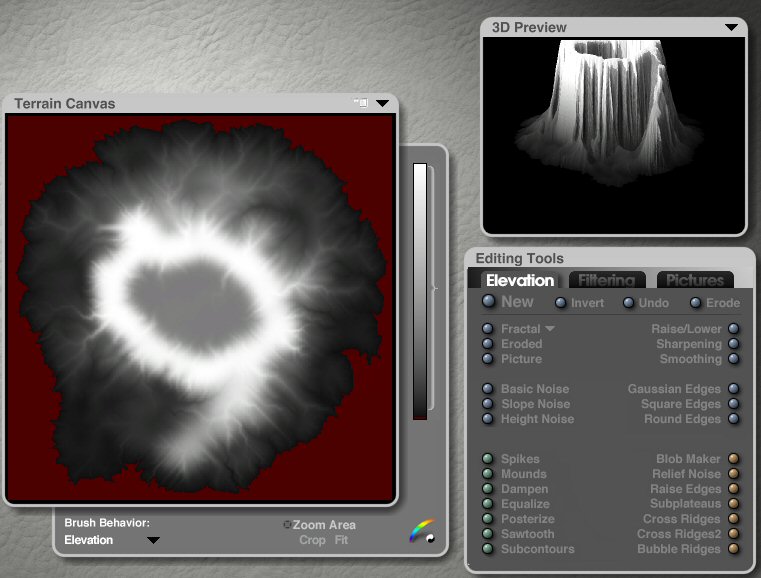
Start with a default mountain. Change your brush to a ball about 10 pixels wide. Set the height to white near the top. Draw a circle on the canvas. You can also add irregular blobs. If you want a deep center cone set the height near the bottom and fill in with the brush. You only need to create a general shape.
Click and drag on the erode button below the fractal button. The more you pull to the right the more the slope smears like a washed out riverbed. Now instead of blobs you have a slope. Use the bottom clipping tool to chop off the square edge. When you are happy with how the terrain looks click the round check button on the bottom right of the screen to return for a moment to the Bryce main window.
You should be back to the wireframe view on the main window. Click on the M (material) button and the Materials Lab window will come up.
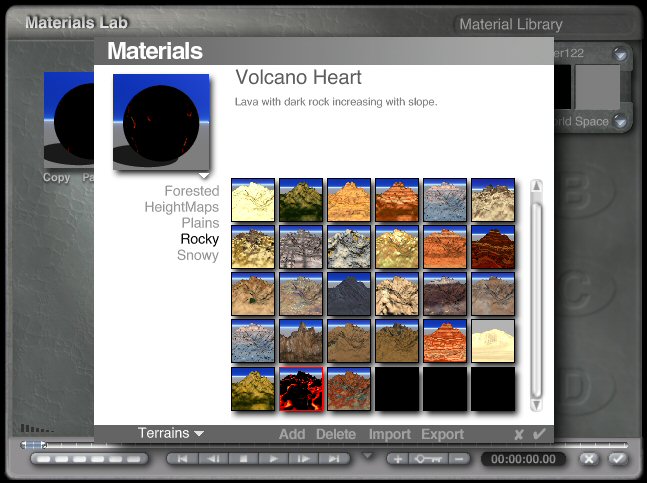
You will see a window on the top left with a gray sphere in it. On the right side of this window is a right pointing arrow. Click on this to make the materials window come up. This window opens up to show a bunch of boxes with different material designs in each. Along the bottom is a gray edge. In the image shown is the word terrain and a down arrow. Click on the arrow to make a menu with all the different types of materials appear. There are clouds, water, rocks, etc. but the terrains are the ones you want now. If there is more than one type of terrain a list of names will appear under the gray ball window. There are several good desert type materials, granites; I chose one called volcano heart but try several. Click on square and the gray ball will change and take on the material of the clicked window. When you are satisfied click the check on the gray edge and the materials window will close. Click on the second check button on the Materials Lab window and this window will also close and you will be back in the wireframe view.
Click on the E button to go back into the terrain editor. Click on the down arrow on the terrain canvas and select export.
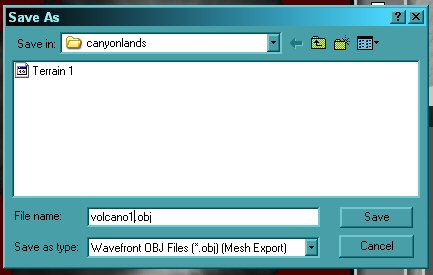
A window will pop up with the words "Save As" on the top this is a standard save window and you can do the same things like change directory create folders etc. The file name will default to terrain 1. You can change this to volcano1 or whatever you want.
There are save as types for export including 3ds dxf. The best type for the game is to use wavefront obj. When these selections are made press the save button to the right.
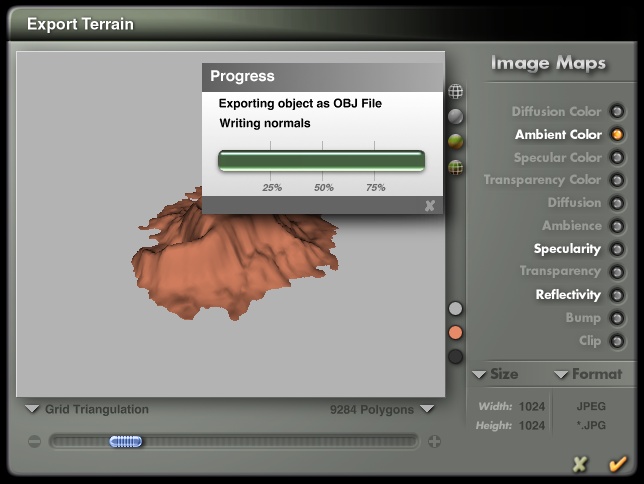
The export terrain window will pop up showing the mesh to be exported. The slider at the bottom can be moved to increase or decrease the polygons. Too much of an increase will lock the program. Try not to go above 10000.
The exporter will also create texture maps. Diffusion, ambient color, reflection, transparency, and bump components are available. For now, just select Ambient and de-select the others.
The size refers to pixel size of the image textures. The format allows for bmp, jpg or other image types. It is currently set to "Default". To change each, click on the down arrows and select from the menus. For this example, set the size to 1024x1024 and the format to JPEG->High Quality.
Once everything is selected, click on the check button on the bottom right of the window. The mesh and images will be generated and the progress bar will appear. Then the window will close and leave you back in the terrain editor again.
Click the check button on the terrain editor to exit to the Bryce main window. Move the mouse to the top and click on the windows bar that appears. Click the word "File" and pull all the way down to the word "Quit". Save the Bryce file (if you want) then exit the program.
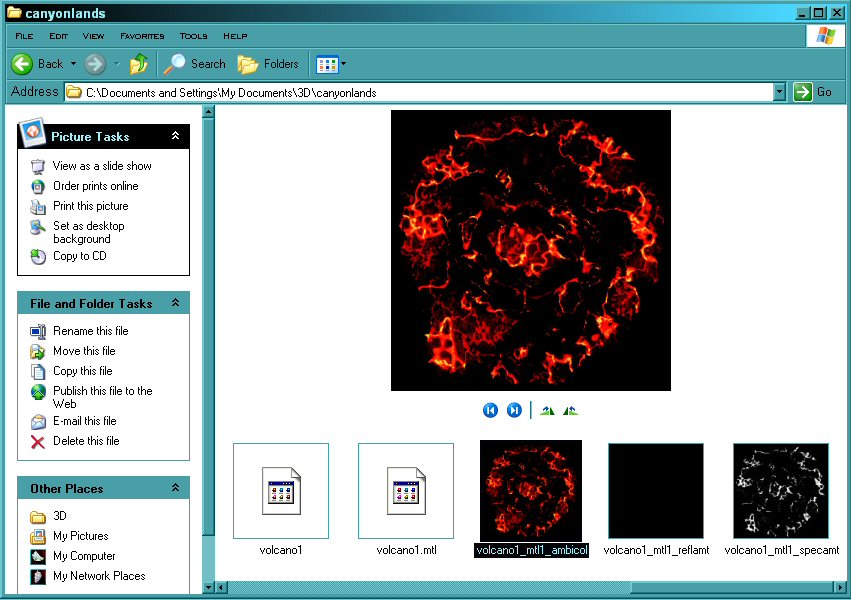
Look in the folder where you saved the object and you will see the mesh and textures you created.

