
Max:Basic Material Animation
|
|
This is a tutorial page.Versions available: PyPRP; 3ds Max; Korman. |
The purpose of this tutorial is to help you implement basic animation as a texture layer using the MOULa 3DSMax Plugin in your Ages. This process can be observed in MO:ULa when water bodies come into contact with solid objects, as the water can be seen rippling near the edges of said objects; the same technique is used for waterfall texture animations.
Please note that this is but one of many animation techniques. It is used throughout MO:ULa, providing Eder Gira with a night and day version, Gahreesen with a flashing door light, and so on.
Contents
Prerequisites
It is assumed you know how to set up the Cyan Plugin for use in Max and that you are ready for Age Creation. It also assumes that you know you must attach the PageInfo component to your objects. Lastly, it assumes you know how to apply a Plasma Standard material and textures to your objects as well as how to UV Map them.
Tutorials
You will need to have read and understood the following tutorials:
Getting Started
For the animation of a texture such as "Water Ripples" or "Waterfalls", all that is needed is to have the UV coordinated that have been mapped to the texture offset themselves.
Preparation
You will evidently require a model to work with for your animations. For this tutorial, we will be using a simple-looking well for demonstration purposes with a mesh added that has a "water" texture for the surface of the well's water. A mesh has also been added just above the water mesh.
NOTE: in this case, the water is NOT a waveset. Just like the small puddles in Er'cana, not all of your water will be a waveset. However, you CAN have ripples for waveset water too, and not just shore foam.
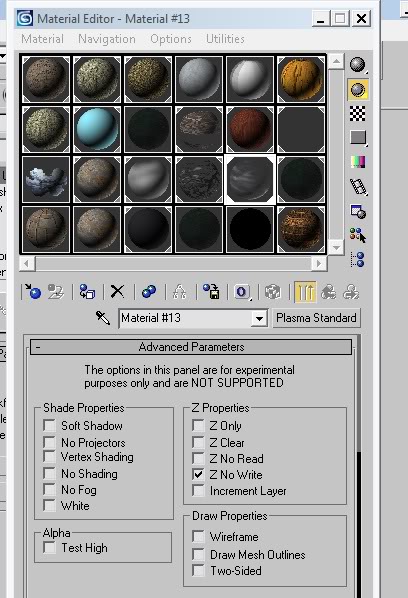
Note before proceeding that, in the picture provided here, you can look through the "ripples" mesh straight to the bottom of the well. In other words, wherever the ripple mesh is, the water mesh's texture appears to be gone. This is because the Plasma game engine is a bit confused as to how to handle the transparencies of both textures when one mesh is over another mesh; it needs to be explicitly told what to do. Whereas in Blender, something called "Passindex" is used, in Max, you will use something called "No Z Write":
- Open the Material Editor.
- Select the Material assigned to your Ripple mesh.
- Open up the roll out box called "Advanced Parameters".
- Under "Z Properties" box, check the "Z No Write" box. Ignore the warning at the top (Cyan uses these settings for such animations).
Now the two textures will render correctly under Plasma.
NOTE: this tutorial's model uses Cyan's ripple texture here for the tutorial. You will need to make your own ripple textures (one suggested technique is to create a texture with a transparent background and spray paint some wavy white lines onto it).
Animating
Now that the ripples mesh with its material and texture applied and correctly UV mapped, the actual process of animating them can begin.
- Tell the unwrapping tool to "Flatten" your faces.
- Select one of the faces and make it a full square on your texture.
- Select "Copy" for that face, select the other faces and click on "Paste".
- Make sure your Ripple mesh is selected.
- Call up its Material.
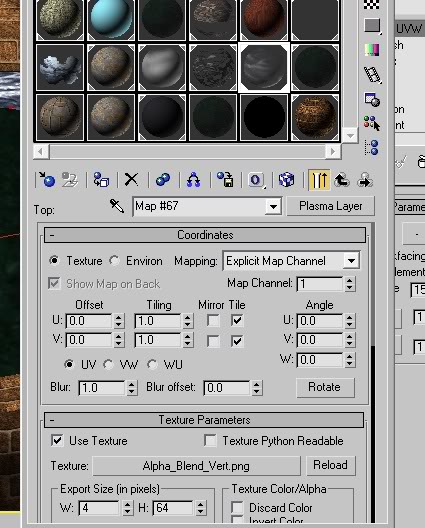
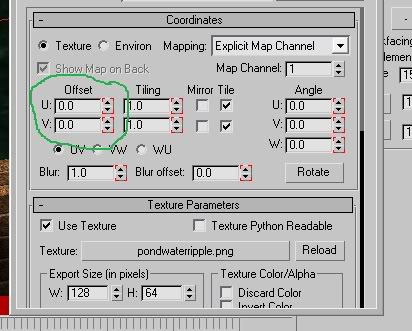
- Select the layer that is your ripple texture (the picture provided here demonstrates for the Alpha Blend texture). You will be using the "Coordinates" roll out box for what follows.
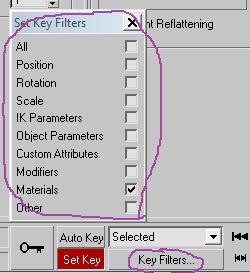
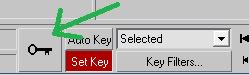
- Go down in Max where the Animation Controls are and where Keys are set.
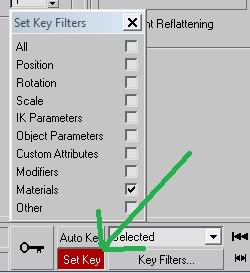
- Click on the Keys Filter.
- In the little box that appears, remove all the checks and make sure a checkmark is applied where it reads Materials.
- Click on the Set Key box in order to start setting the Keys for your texture's animation.
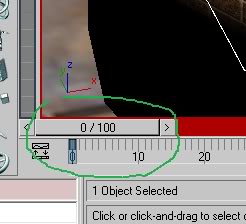
- Go to the animation timeline bar and make sure it is sitting at frame 0
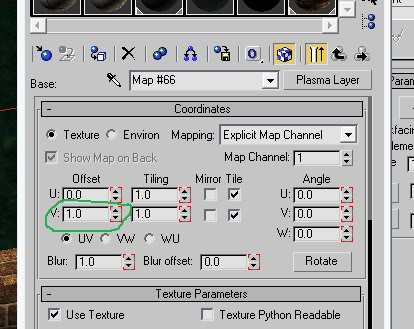
- Go back to the Material Editor and make sure your U and V coordinates for Offset are both set to 0.0. Note the little red brackets. Each of the things they surround represent items you can animate. This tutorial will limit itself to UV Offsets for now.
- Go back down and click on the button with the picture of a key on it. Doing so will set the first Key at frame 0.
- You should now see the Key marker in the time line, and it should be at frame 0.
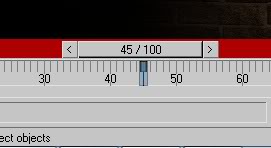
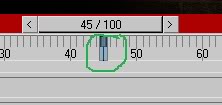
- Move your timeline bar to the next frame you will set a key at (your choice). Default setting for Max: 30 frames equals 1 second. Moving it to frame 45 (1.5 seconds) seems to work well with ripples. If you have a texture that you need to appear to move faster, you would set the key to a lower frame number, and vice versa. Note: in Max, once the keys have been set, the animation player at the bottom of Max can be used to watch the current animations in real time.
- Go back up to the Material Edit and to the Coordinate roll out box. The offsets need to be changed. Once more, what you change them to, and which one you change, will depend upon what you are doing and how you mapped your texture. Changing either setting to 1.0 will be like scrolling the texture fully, which is the desired effect. In Max, the U coordinate is the same as the X coordinate in Blender and the V the same as the Y. Because of how the ripple texture was UV Mapped, you'll want to scroll it fully along the V coordinate. So the offset is changed to 1.0 there.
- Go back down and click on the Key button to set the key at this frame. The animation will now play when you move your timeline back and forth, or should you press the "Play" button on your animation player. However, you still need to let the material know WHEN to play this animation.
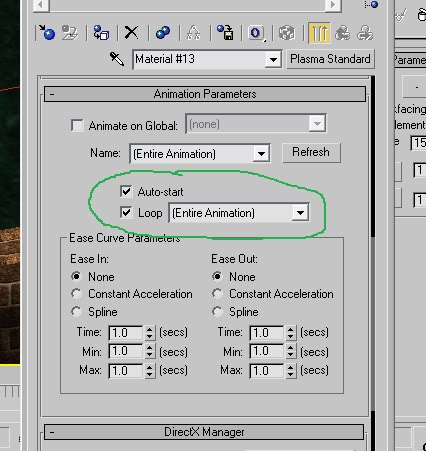
- Under Material Editor, make sure you are in the Material and not the Plasma Layer. Look for a roll out box labelled "Animation Parameters".
- Put check marks next to "Autoplay" and "Loop".
Your animation is now complete. No extra Plasma Components need to be attached to this kind of animation, unlike other types of texture animations (e.g. a flashing symbol for a player when they get close to the object, which would involve a sensor region and a trigger to play the texture animation only when the avatar enters the sensor region).
End Result
The end result for the tutorial's example can be viewed here: