
Difference between revisions of "Max:Clickables"
m (moved Making Clickables to Max:Clickables) |
|||
| Line 1: | Line 1: | ||
| − | {{ | + | {{Tutorial|Clickables}} |
| + | A Clickable is an in-game object that the player can click on when their circle is no longer empty, but filled with a dot in the center (giving it the appearance of a target). Clickables have numerous uses, from levers to pull to buttons to push to rocks to shove and so on. In most cases, you will also want to animate the avatar when he clicks something. The exceptions are what are called GUI Dialogs, which pop up on screen (static examples include journals, notes, Yeesha pages; there are also interactive GUI Dialogs, for which you might not want avatar animation but object animation). Many of these objects can become very complex and involved, so they will not be covered here. | ||
| − | + | This tutorial will begin by teaching you how to turn an object into a Clickable using Max. | |
| − | + | == Prerequisites == | |
| + | You will need a sample Age to work on. You must of course be familiar with the workings of the Plasma plugin. | ||
| − | + | === Tutorials === | |
| + | * [[Max:Getting Started]] | ||
| − | + | == Getting Started == | |
| + | This tutorial will produce a clickable that when clicked-on will link the player to another Age. | ||
| − | + | === Setting the Stage === | |
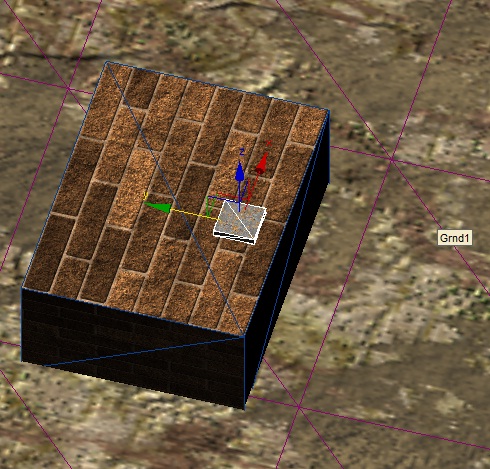
| + | [[File:ClickLink1.jpg|thumb|right|200px|The setup this tutorial will be using.]]You'll need to set up a few objects before you can begin making Clickables. | ||
| + | # Create something that the avatar can click on (such as a [[Media:ClickLink1.jpg|flat plate]]). The position of this item will be extremely important if you plan on animating the avatar; for this tutorial, the box will be 3 feet high and the plate placed near the edge. Don't forget to add the object to your PageInfo. You'll probably want to rename your item to something more useful too; this tutorial will call it "LinkPlate". | ||
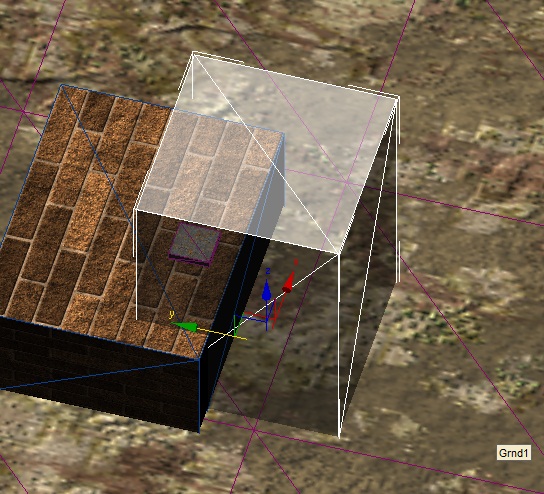
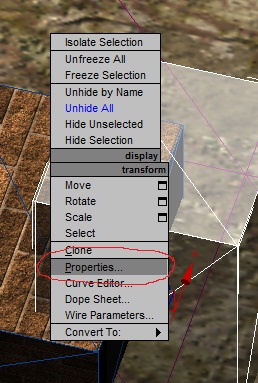
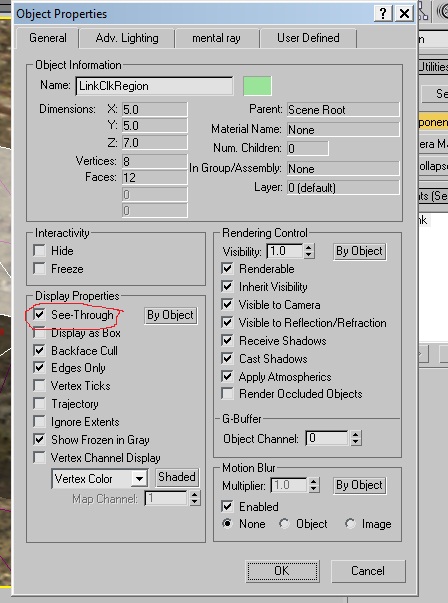
| + | # Create a region for this clickable. They can be used to ensure that the avatar can not click on something from far away, for example, but are not mandatory. The region needs to be big enough to encompass the avatar (so no smaller than 3 by 3 by 6 feet). This tutorial uses a 5 x 5 x 7 box, since even though the avatar is 6 feet high, you'll want to [[Media:ClickLink2.jpg|dip the region]] just below the floor that the avatar is standing on. You can make the box transparent in Max by selecting and right-clicking it, then [[Media:ClickLink3.jpg|navigating to "Properties..."]]. In the pop-box, check the "[[Media:ClickLink4.jpg|See-Through]]" parameter under "Display Properties". You could use check "Display As Box" which will show only the lines. You might also want to rename it to something more useful; this tutorial will call it "LinkClkRegion". | ||
| − | + | === Adding a Region and a Clickable === | |
| + | # Select your Region, then call up the Component Manager. Click on [[Media:ClickLink5.jpg|New->Detector->Region Sensor]] and attach it to your Region. Again, you might want to rename it to a better name. | ||
| + | # Go to the Utils tab (as represented by a hammer icon) and click on the "Component Util" button. [[Media:ClickLink6.jpg|Select the Region sensor]] you've just added to your Region. This tutorial won't use more advanced parameters, and the defaults are fine, but you might be interested in this section should you wish to make something happen when your avatar enters that Region. | ||
| + | # Select the object set on becoming a Clickable ("LinkPlate" in this tutorial) and call up the component Manager. Navigate to [[Media:ClickLink7.jpg|New->Detector->Clickable]] and attach it to your Clickable object (renaming it is advised). | ||
| + | # While still in the Component Manager, click on [[Media:ClickLink8.jpg|New->Logic->Responder]] and attach it to your Clickable object (renaming it is advised). | ||
| + | # Go to the Utils tab and click "Component Util". Select your Clickable component, then click on the button indicated by [[Media:ClickLink10.jpg|this arrow]]; your button should read "None". Then click on the Click Region you made in your 3D Scene. The button's label should change to reflect the name of your region. ''Alternative'': If you chose not to use a region, leave the button alone and put a check mark next to "Ignore". | ||
| + | # Select your [[Media:ClickLink11.jpg|Responder Component]] in Component Util. | ||
| + | # Click on the Add button under the Detectors box (as indicated by the arrow in the previous screenshot). This will open up [[Media:ClickLink12.jpg|a box]]. The Responder needs to be told what it is supposed to detect, whether it is when the avatar is in the region or when the player clicks on something. | ||
| + | # Select your Clickable component in this box. We want the Responder to detect when the player clicks on this object. Your Clickable component should now be in the [[Media:ClickLink13.jpg|Detectors box]]. | ||
| − | + | === Adding Actions === | |
| − | === | + | # Things can get quite complex from hereon, should you make more than one thing happen. A good example would be a lever that the avatar must pull: the responder would need to be told to animate the avatar, animate the lever, make a sound, and ''then'' activate whatever is supposed to happen afterwards, such as a rising platform, an opening door, etc. For this tutorial, no linking animation will be done and the link sequence will happen immediately. |
| + | # Click on the Add button pointed to by the arrow in the preceding picture; a [[Media:ClickLink14.jpg|small box will pop up]]. You'll notice there is a plethora of options available to you; for this tutorial, click on Link. You'll notice that [[Media:ClickLink15.jpg|a lot more of information]] will have been added to the Responder component. | ||
| + | # The game now needs to be told where your avatar will be linking too. Before doing so, however, you'll need an actual Age the avatar can link to. As such, you'll need to copy the <code>.age</code> file of that Age into the Max Output folder specified in the <code>PlasmaMAX2.ini</code> file; any Age will do for this tutorial, but remember well its name (e.g. Gahreesen's file name is actually "Garrison"). | ||
| + | # Go back to your Responder component. You need to set the linking settings now. The "Linking Rule" parameter can be left to its default setting, but you need to select your copied Age from the dropdown list under "Age Filename" (if it isn't showing up, then you didn't copy the file to the appropriate folder). | ||
| + | # The next four boxes can be ignored; by default the avatar's Spawn Point will be the Start Point. The last box describes the animation the avatar will play once he has linked to that Age; the default option can be left. | ||
| + | # Select once more the name of the Age the avatar will be linking too under "[[Media:ClickLink18.jpg|Parent Age Filename]]". | ||
| + | Your Age is now ready to be exported and tested. | ||
| − | + | == Troubleshooting == | |
| − | + | If something is incorrectly done, it's quite likely nothing will work at all. There are a few common problems: | |
| − | + | * '''Your cursor is not going hot:''' something is probably wrong with the Clickable or the Region. | |
| − | + | * '''Your cursor is going hot but nothing happens when the Clickable is clicked on:''' the Responder on the Clickable is most likely the problem, or your action (e.g. an animation, a link, a GUI Dialog, etc.) has a problem getting done. | |
| − | + | ||
| − | + | ||
| − | + | ||
| − | + | ||
| − | + | ||
| − | + | ||
| − | + | ||
| − | + | ||
| − | + | ||
| − | + | ||
| − | + | ||
| − | + | ||
| − | + | ||
| − | + | ||
| − | + | ||
| − | + | ||
| − | + | ||
| − | + | ||
| − | + | ||
| − | + | ||
| − | + | ||
| − | + | ||
| − | + | ||
| − | + | ||
| − | + | ||
| − | + | ||
| − | + | ||
| − | + | ||
| − | + | ||
| − | + | ||
| − | + | ||
| − | + | ||
| − | + | ||
| − | + | ||
| − | + | ||
| − | + | ||
| − | + | ||
| − | + | ||
| − | + | ||
| − | + | ||
| − | + | ||
| − | + | ||
| − | + | ||
| − | + | ||
| − | + | ||
| − | + | ||
| − | + | ||
| − | + | ||
| − | + | ||
| − | + | ||
| − | + | ||
| − | + | ||
| − | + | ||
| − | + | ||
| − | + | ||
| − | + | ||
| − | + | ||
| − | + | ||
| − | + | ||
| − | + | ||
| − | + | ||
| − | + | ||
| − | + | ||
| − | + | ||
| − | + | ||
| − | + | ||
| − | + | ||
| − | + | ||
| − | + | ||
| − | + | ||
| − | + | ||
| − | + | ||
| − | + | ||
| − | + | ||
| − | + | ||
| − | + | ||
| − | + | ||
| − | + | ||
| − | + | ||
| − | + | ||
| − | + | ||
| − | + | ||
| − | + | ||
| − | + | ||
| − | + | ||
| − | + | ||
| − | + | ||
| − | + | ||
| − | + | ||
| − | + | ||
| − | + | ||
| − | + | ||
| − | + | ||
| − | + | ||
| − | + | ||
| − | + | ||
| − | + | ||
| − | + | ||
| − | + | ||
| − | + | ||
| − | + | ||
| − | + | ||
| − | + | ||
| − | + | ||
| − | + | ||
| − | + | ||
| − | + | ||
| − | + | ||
| − | + | ||
| − | + | ||
| − | + | ||
| − | + | ||
| − | + | ||
| − | + | ||
| − | + | ||
| − | + | ||
| − | + | ||
| − | + | ||
| − | + | ||
| − | + | ||
| − | + | ||
Revision as of 13:25, 5 April 2012
|
|
This is a tutorial page.Versions available: PyPRP; 3ds Max; Korman. |
A Clickable is an in-game object that the player can click on when their circle is no longer empty, but filled with a dot in the center (giving it the appearance of a target). Clickables have numerous uses, from levers to pull to buttons to push to rocks to shove and so on. In most cases, you will also want to animate the avatar when he clicks something. The exceptions are what are called GUI Dialogs, which pop up on screen (static examples include journals, notes, Yeesha pages; there are also interactive GUI Dialogs, for which you might not want avatar animation but object animation). Many of these objects can become very complex and involved, so they will not be covered here.
This tutorial will begin by teaching you how to turn an object into a Clickable using Max.
Contents
Prerequisites
You will need a sample Age to work on. You must of course be familiar with the workings of the Plasma plugin.
Tutorials
Getting Started
This tutorial will produce a clickable that when clicked-on will link the player to another Age.
Setting the Stage
You'll need to set up a few objects before you can begin making Clickables.
- Create something that the avatar can click on (such as a flat plate). The position of this item will be extremely important if you plan on animating the avatar; for this tutorial, the box will be 3 feet high and the plate placed near the edge. Don't forget to add the object to your PageInfo. You'll probably want to rename your item to something more useful too; this tutorial will call it "LinkPlate".
- Create a region for this clickable. They can be used to ensure that the avatar can not click on something from far away, for example, but are not mandatory. The region needs to be big enough to encompass the avatar (so no smaller than 3 by 3 by 6 feet). This tutorial uses a 5 x 5 x 7 box, since even though the avatar is 6 feet high, you'll want to dip the region just below the floor that the avatar is standing on. You can make the box transparent in Max by selecting and right-clicking it, then navigating to "Properties...". In the pop-box, check the "See-Through" parameter under "Display Properties". You could use check "Display As Box" which will show only the lines. You might also want to rename it to something more useful; this tutorial will call it "LinkClkRegion".
Adding a Region and a Clickable
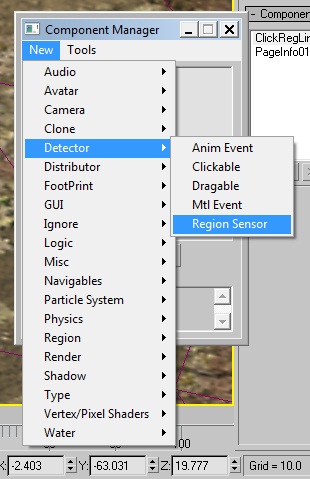
- Select your Region, then call up the Component Manager. Click on New->Detector->Region Sensor and attach it to your Region. Again, you might want to rename it to a better name.
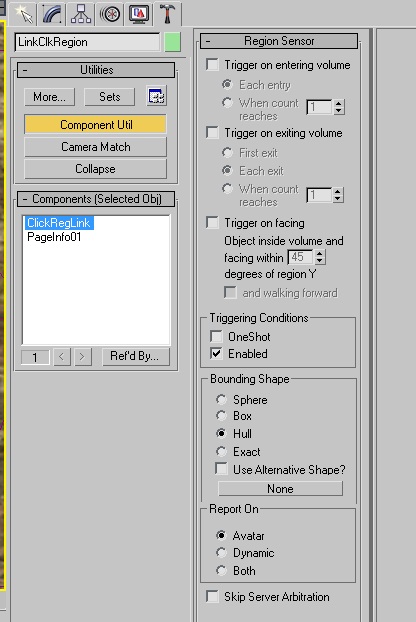
- Go to the Utils tab (as represented by a hammer icon) and click on the "Component Util" button. Select the Region sensor you've just added to your Region. This tutorial won't use more advanced parameters, and the defaults are fine, but you might be interested in this section should you wish to make something happen when your avatar enters that Region.
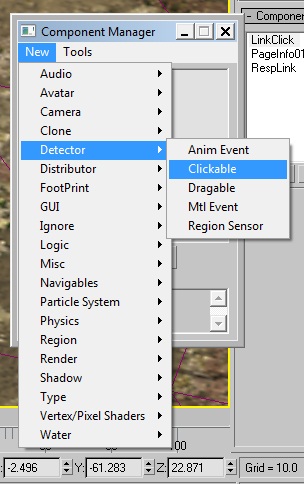
- Select the object set on becoming a Clickable ("LinkPlate" in this tutorial) and call up the component Manager. Navigate to New->Detector->Clickable and attach it to your Clickable object (renaming it is advised).
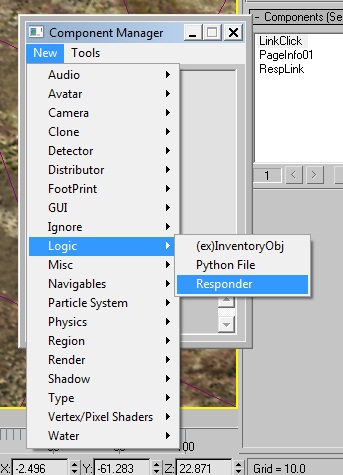
- While still in the Component Manager, click on New->Logic->Responder and attach it to your Clickable object (renaming it is advised).
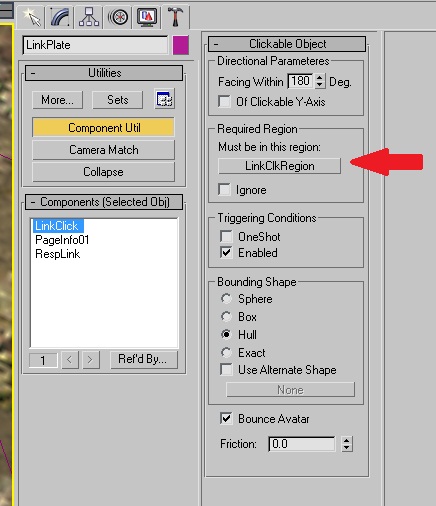
- Go to the Utils tab and click "Component Util". Select your Clickable component, then click on the button indicated by this arrow; your button should read "None". Then click on the Click Region you made in your 3D Scene. The button's label should change to reflect the name of your region. Alternative: If you chose not to use a region, leave the button alone and put a check mark next to "Ignore".
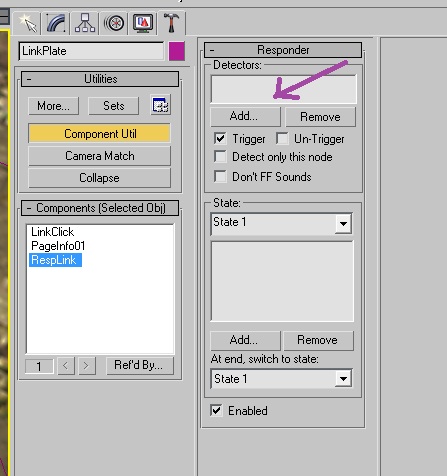
- Select your Responder Component in Component Util.
- Click on the Add button under the Detectors box (as indicated by the arrow in the previous screenshot). This will open up a box. The Responder needs to be told what it is supposed to detect, whether it is when the avatar is in the region or when the player clicks on something.
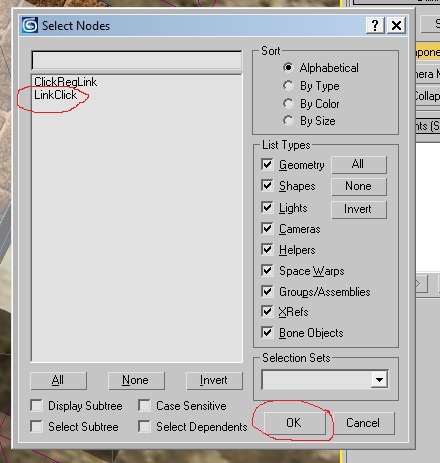
- Select your Clickable component in this box. We want the Responder to detect when the player clicks on this object. Your Clickable component should now be in the Detectors box.
Adding Actions
- Things can get quite complex from hereon, should you make more than one thing happen. A good example would be a lever that the avatar must pull: the responder would need to be told to animate the avatar, animate the lever, make a sound, and then activate whatever is supposed to happen afterwards, such as a rising platform, an opening door, etc. For this tutorial, no linking animation will be done and the link sequence will happen immediately.
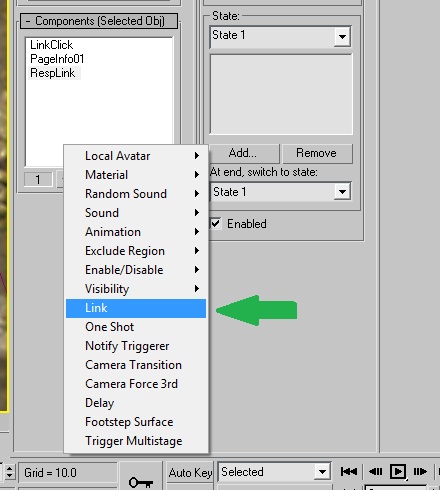
- Click on the Add button pointed to by the arrow in the preceding picture; a small box will pop up. You'll notice there is a plethora of options available to you; for this tutorial, click on Link. You'll notice that a lot more of information will have been added to the Responder component.
- The game now needs to be told where your avatar will be linking too. Before doing so, however, you'll need an actual Age the avatar can link to. As such, you'll need to copy the
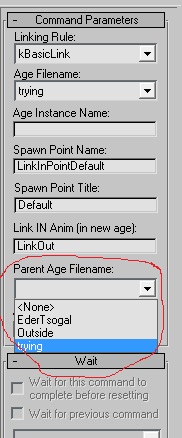
.agefile of that Age into the Max Output folder specified in thePlasmaMAX2.inifile; any Age will do for this tutorial, but remember well its name (e.g. Gahreesen's file name is actually "Garrison"). - Go back to your Responder component. You need to set the linking settings now. The "Linking Rule" parameter can be left to its default setting, but you need to select your copied Age from the dropdown list under "Age Filename" (if it isn't showing up, then you didn't copy the file to the appropriate folder).
- The next four boxes can be ignored; by default the avatar's Spawn Point will be the Start Point. The last box describes the animation the avatar will play once he has linked to that Age; the default option can be left.
- Select once more the name of the Age the avatar will be linking too under "Parent Age Filename".
Your Age is now ready to be exported and tested.
Troubleshooting
If something is incorrectly done, it's quite likely nothing will work at all. There are a few common problems:
- Your cursor is not going hot: something is probably wrong with the Clickable or the Region.
- Your cursor is going hot but nothing happens when the Clickable is clicked on: the Responder on the Clickable is most likely the problem, or your action (e.g. an animation, a link, a GUI Dialog, etc.) has a problem getting done.