
Difference between revisions of "Max:Getting Started"
Christopher (Talk | contribs) (Created page with "{{Tutorial|Basics}} What you are going to make. (I used the fog from Relto) What you will need: *Knowledge on how to use 3ds max *The Plasma P...") |
m (moved Max:Basics to Max:Getting Started) |
(No difference)
| |
Revision as of 13:28, 5 April 2012
|
|
This is a tutorial page.Versions available: PyPRP; 3ds Max; Korman. |

What you will need:
- Knowledge on how to use 3ds max
- The Plasma Plugin, installed and ready to use
What you will learn:
- Creating an .age file
- Creating an .fni file
- How to use the Component Manager
- Using the following Components:
- Page Info
- Starting Point
- Terrain
- No Show
- Ignore
- Export and finalizing an age
Contents
Adjusting your Plugin
The following steps are not necessary, but I recommend it because it might speed up your workflow.
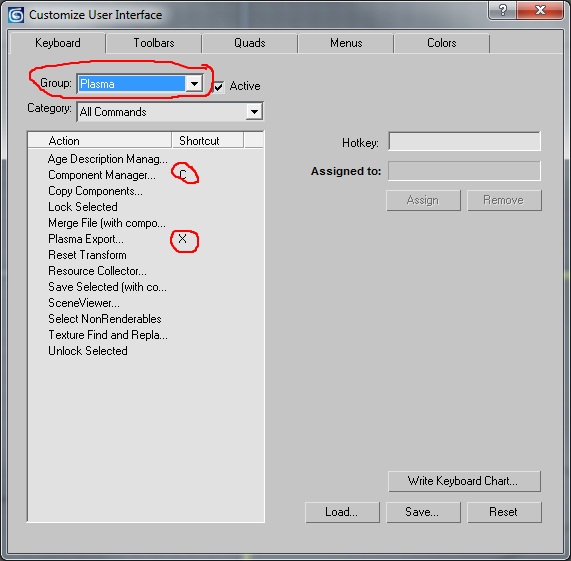
- Go to Customize->Customize User Interface...
- In the "Keyboard" tab under Group select "Plasma" from the dropdown-box
- Select "Component Manager" from the list below and assign "C" as Hotkey
- Do the same with "Plasma Export..." but this time assign "X" as Hotkey
Creating your .age file
Go to your output folder and create a new .txt file. Open it with an editor and write the following text into it:
StartDateTime=0000000000
DayLength=24.000000
MaxCapacity=10
LingerTime=180
SequencePrefix=8536
ReleaseVersion=0
Page=mainroom,1
StartDateTime is the unix time of the date the Age starts counting its days. For now you can leave it at 0000000000, but you'll have to change it if you want to make Global Animations.
DayLength is the length of a day in hours. For now you can leave it at 24 hours, but maybe you have to change it if you want to make Global Animations.
MaxCapacity is the maximum amount of players who may enter this age at the same time.
LingerTime is optional. It defines the time in seconds until the game server (only MOULa) will shut down if the age is empty.
SequencePrefix is a very important option. It is a unique number for your age. Every age in Uru needs it's own ID. If you want to create an age for TPOTS you can register a prefix in the TPOTS Sequence Prefixes-list.
ReleaseVersion is not really important. You can leave it at 0 and don't need to change it.
Page is the most important thing. Every age file also has prp files. These prp files are defined by this option. In Max you can choose to which page the objects should be exported. You can also make more than one page, you only have to change the IDs behind the pagename, like this:
Page=mainroom,1
Page=caves,2
Page=interior,3
...
If you are done save and close the file. Then rename it to YourAge.age, with "YourAge" as the name of your age. Be careful that it is not called YourAge.age.txt!!!
Creating your .fni file
If you are creating an age for TPOTS it is not necessary to create an fni file. It is created automatically when you convert your age using Drizzle, but if you want to have fog in your age, you'll have to edit the file after converting your age. If you are writing an age for MOULa you MUST create the file. If your age does not have it, it will use the settings from your last visited age.
Now create a new .txt file and write the following into it:
Graphics.Renderer.SetYon 100000
Graphics.Renderer.Fog.SetDefLinear 0 0 0
Graphics.Renderer.Fog.SetDefColor 0 0 0
Graphics.Renderer.SetClearColor 0 0 0
SetYon is the maximum distance in feet how far you can see in your age. Everything behind this distance looks like a wall with a predefined color.
SetDef... defines how dense your fog will look. There are the following possibilities:
- SetDefLinear 0 0 0 means that the density of your fog is raising linear. The fist value is the start distance in feet (-10000 to 1000000), the second value is the end distance in feet (-10000 to 1000000) and the third value is the maximum density of the fog (0 to 1).
- SetDefEXP 0 0 means that the density is raising exponential. The first value is the end distance in feet (-10000 to 1000000) and the second value the maximum density (0 to 1).
- SetDefEXP2 0 0 is another exponential function similar to SetDefEXP.
The fog behind the end distance will have the maximum density you defined.
SetDefColor is the color of your fog. It needs an RGB value from 0 to 1.
SetClearColor is the color you see if there is nothing to see (for example if you don't have a sky you will see this color instead). This is also the color you see behind the distance you defined by SetYon. It needs and RGB value from 0 to 1. It is best to set it the same color as the fog.
Now you have to save and close your file and name it YourAge.fni, with "YourAge" as the name of your age. Be careful that it is not called YourAge.fni.txt!!! If you created this file for MOULa, you will have to encrypt it, for example by using the libHSPlasma Tools.
Finally, you are ready to start working in Max.
Working in Max
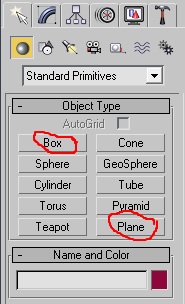
First create a plane and two boxes.
Set the size of the plane to 500x500, one box to 1x1x1 and the second box to 1x1x6. The plane will be your ground where you can walk. The small box will be your spawnpoint and the greater box is a reference on how big your Avatar is. It's also very important to use appropriate objects names, so you can easily find your objects again. I called the plane oGround, where "o" stands for object. The boxes I called dSpawn and dAvatar, where "d" stands for dummy.
Now move your Spawnpoint to the location where you want your avatar to spawn. Please note, that your spawnpoint sould be a little bit (0,01 to 0,1 feet) above the ground, so your avatar cannot fall through it.
We also want to have light in our age. There are basically two kinds of light:
- Standard and Photometric lights are not exported by the plugin but the effect on your static objects will be exported.
- Plasma Run Time lights are plasma lights. They are exported and used to light moving objects like your avatar or animated objects. Run Time Lights need a lot of resources and only the nearest 8 lights are rendered. So, do not use too many of them.
Goto the light tab and select a Standard or Photometric light. Place it in the scene, so that all is lit up (I recommend "Omni"-lights or an "IES Sun"). Now select a Plasma Run Time Light, I used the RT Directional, and place it above your scene, so that the arrows can reach the whole world (maybe you have to scale it or play with the values in the modifier tab).
The "Page Info" Component
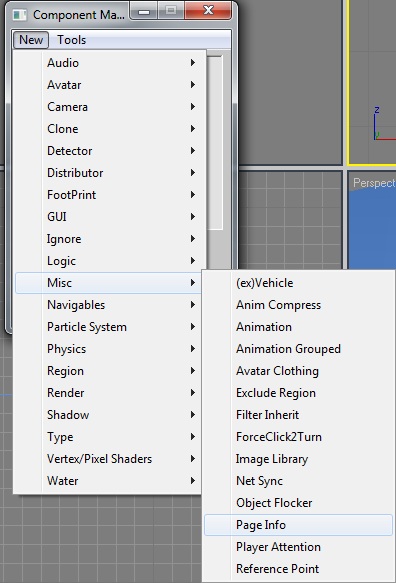
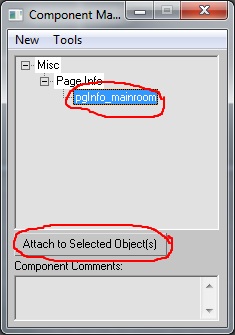
Now open up your Component Manager (I bound it to "C"). If you go to new, you will see, that there are many components, but for now we are only using a few of them. First of all, you need a "Page Info"-component. So go to New->Misc->Page Info. Now rename it (right click on the component) to something useful. I recommend to also give it a prefix because if you have many objects and components it may happen that an object and a component share the same name, but Plasma does not like that and gives you an error when you want to export. So all my objects have an "o", all my dummys have a "d" and my Page Info is called "pgInfo_mainroom". But for what do we need this component? Every object in an age must have this component (except Max Standard Lights).
Select all your objects and attach the Page Info to them.
Now go to your utilities tab. If you don't have the "Component Util" tab yet, select "Configure Button Sets" and search it in the list. Then drag it onto a button.
When you now select your Component Util you should have the Page Info in there. If you select an object, all the components attached to it are listed in the component util. So, select your Page Info and take a look into it:

Age is where you have to select your age.
Page is where you have to select into which prp the objects shall be exported.
Itinerant is not interesting and should not be used. I don't know what it does.
Select your age and your page.
Creating a collision
Next, we want to have a collision for our ground, so in your Component Manager go to New->Physics->Terrain and attach it to your ground plane. Rename it to something useful. I use "p" as the prefix.
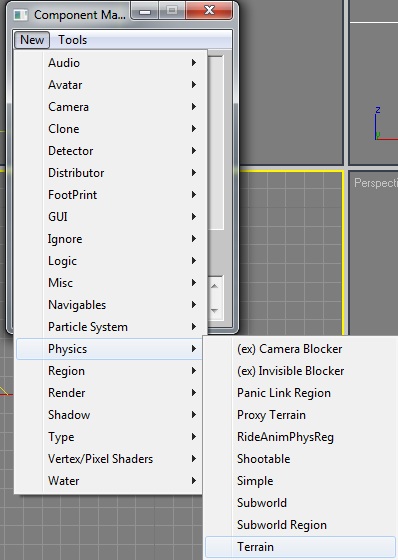
Goto your Component Util and select the Terrain component. This component is used for every object which should have a static collision. Let's have a look:

Physical Properties is very self-explanatory. The values are from 0 to 1.
Bounding Shape is how your collision looks like.
- Sphere is a spherical collision around your object. It cannot be used with any object.
- Box is a collision with the shape of the bounding box of your object.
- Hull uses the hull of your object as collision but does not include holes or similar things, so you cannot go through a door in a wall if you use hull. Hull also doesn't work with planes.
- Exact uses the object itself as collision. It is the most precise type but can also cause a lag if you use it to often or on dynamic objects.
- Use Alternate Shape?: If you check this, you can pick another object as the collision for your object, e.g. if you have a very complicated tree the collision would kill your computer. But you can make a cylinder around the tree and use it as the collision.
- Align Alternate Shape?: If you check this, the engine aligns your new collision like your mainobject.
We will use box for our object because we are using a simple plane.
Creating the Spawnpoint and hiding objects
Now, we have an age with a collision but we want to enter this age. To do this, we need a Spawnpoint.
Select your small box, open your Component Manager and go to New->Type->Starting Point. Rename it to something useful (I use "start_" as prefix) and assign it to your box.
In your Component Util, you can see that there is nothing to do but if you export your age and enter it, you will see that you can see your spawnpoint and your Avatar reference. So, we are going to hide them.
First, go to New->Ignore->NoShow and assign it to your Spawnpoint, then goto New->Ignore->Ignore and assign it to your Avatar reference. Let's take a look at them:
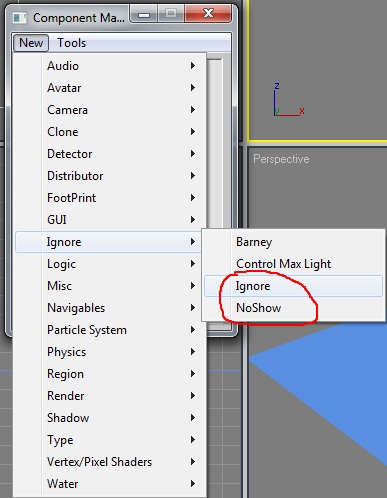

Disable Only ...: If you check this, you can make the object visible through python or a responder.
Affect
- Drawable makes that you can't see the object.
- Physicals makes that also the collision of the object is disabled.
You can leave the settings as they are by default.

Ignore if you check this, your object will not be exported.
We don't need the Avatar reference in the game, so, we can ignore it.
Now, your first age is finished and you can export it with Plasma Export (I bound it to "X").
Finalizing your age
If you made this age for TPOTS you can now convert it with Drizzle and you are done.
If you made this age for MOULa you first have to copy your .age and .fni file. Then you need the libHSPlasma tools. Now, you have to start "PlasmaCrypt" with your Console and type the following:
PlasmaCrypt.exe xtea YourFile
For me it looks like this:

Eventually, you can copy the encrypted files and your prp files to your Uru installation and try your age out.