
Difference between revisions of "Max:Stencils"
Tsar hoikas (Talk | contribs) m (moved Making Stencils to Max:Stencils) |
Tsar hoikas (Talk | contribs) m (→Creating the Stencil) |
||
| (7 intermediate revisions by 4 users not shown) | |||
| Line 1: | Line 1: | ||
| − | + | {{Tutorial|Stencils|Max}} | |
| + | We use stencils in real life to paint a words or patterns on to a surface so we don't cover that entire surface. We can do the same thing with our textures when making Ages for Uru. There are many uses for stencils: you can use them to "paint" a dirt path through some grass, to put moss or grime on a stone, and to make parts of an object reflective or shiny. In this tutorial, we will make part of an object shiny. | ||
| − | + | ==Creating the Stencil== | |
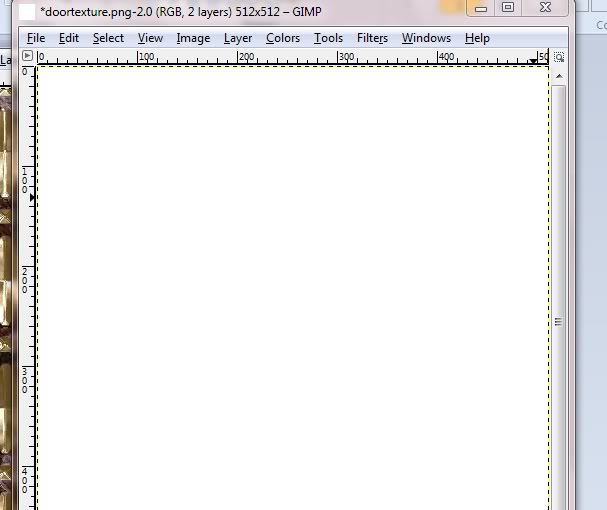
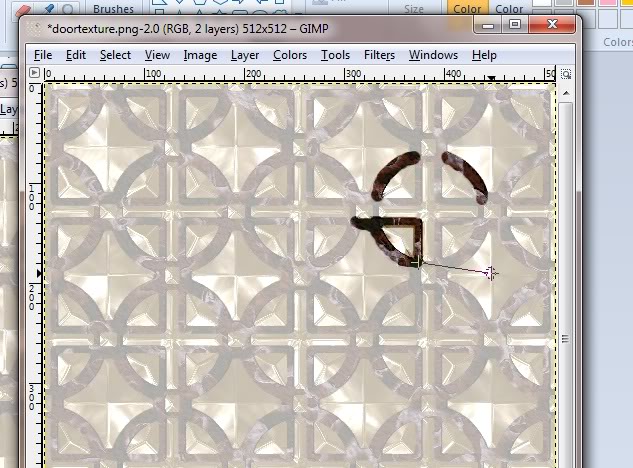
| − | + | [[File:Stenciltut1.jpg|thumb|right|My door texture in GIMP]] | |
| + | I use [http://www.spiralgraphics.biz/genetica.htm Genetica] to make textures and [http://www.gimp.org/ GIMP] to edit them. For example, I created a texture for my doors in my age Neolbah. It's a great texture, but I want the dark purple parts to be reflective like the classroom doors in the Neighborhood. To do this, I need to create a stencil for the dark purple parts. | ||
| − | + | [[File:Stenciltut7.jpg|thumb|right|My door texture with the completed stencil]] | |
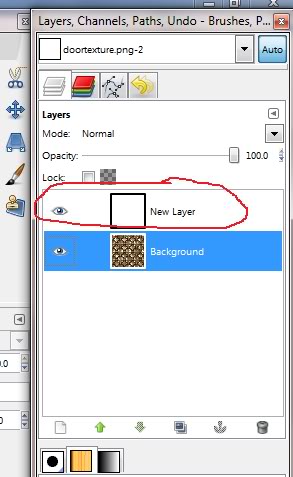
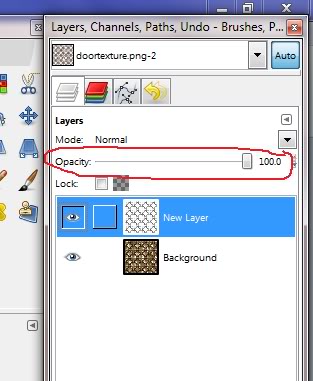
| + | # [[Media:Stenciltut2.jpg|Make a new white layer]]. The texture should now be [[Media:Stenciltut3.jpg|completely white]]--don't panic! | ||
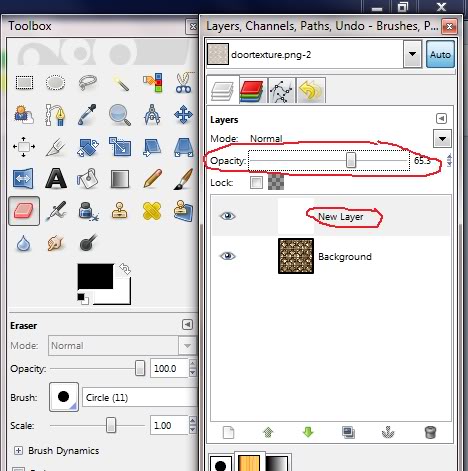
| + | # Now we want to make our stencil, so we should [[Media:Stenciltut4.jpg|lower the opacity]] of the white layer so that we can see both the original texture and the white layer at the [[Media:Stenciltut5.jpg|same time]]. | ||
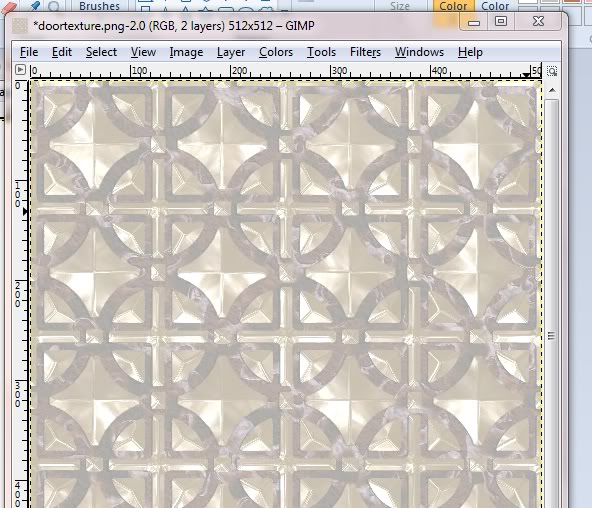
| + | # On the white layer, use the eraser tool to [[Media:Stenciltut6.jpg|erase the white]] that is obscuring the purple grooves. This can be a time consuming process if the surface you're erasing is similar to mine. | ||
| + | # Once you are done, raise the opacity of the white layer [[Media:Stenciltut8.jpg|back to 100%]]. | ||
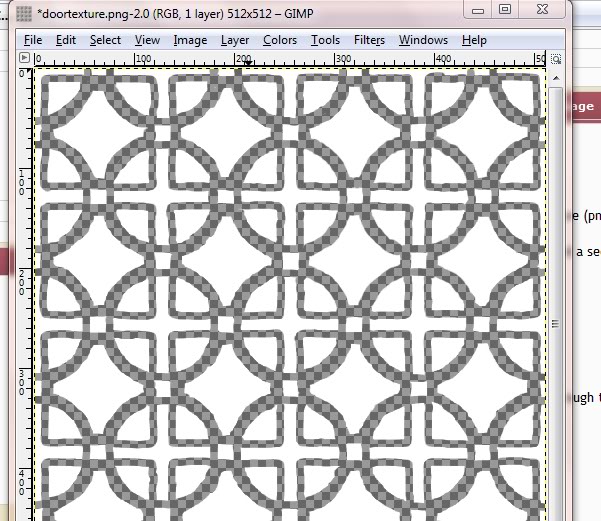
| + | # Delete the original texture layer, leaving only the [[Media:Stenciltut10.jpg|white stencil layer]]. We are left with transparent grooves in the white texture, which will become reflective in game. | ||
| + | # Finally, save your texture. ''Make sure you use the '''Save As''' option, otherwise you will overwrite your real texture with the stencil.'' | ||
| + | {{clear}} | ||
| − | + | ==3ds Max== | |
| + | ===Applying the Stencil=== | ||
| + | # Load the scene and select the object that you're going to apply the stencil to. | ||
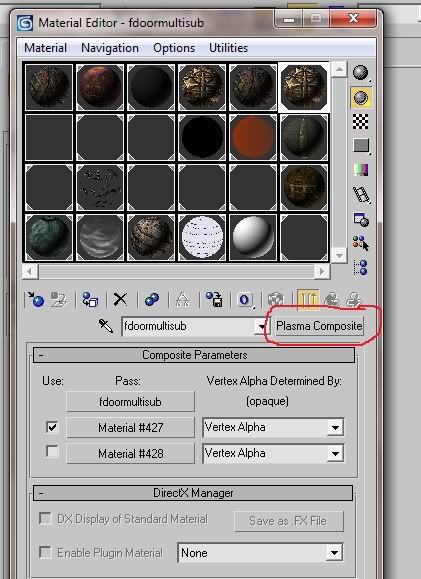
| + | # Open the Material Editor, select a slot, and create a ''new'' [[Media:Stenciltut11.jpg|'''''Plasma Composite''''' Material]]. | ||
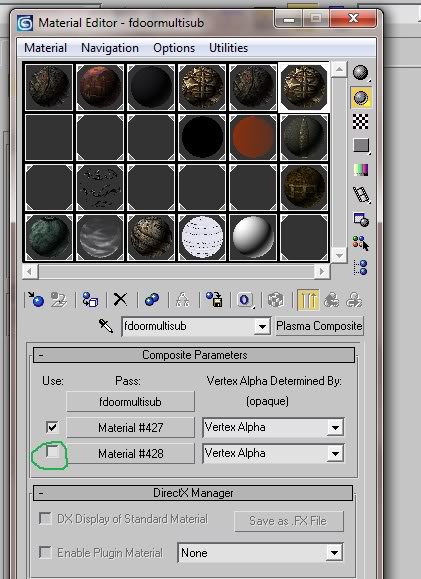
| + | # In Plasma Composite you have three ''passes''--you can think of them as submaterials. For our stencil, we are only going to use 2 of the passes, so [[Media:Stenciltut12.jpg|uncheck the third pass]]. | ||
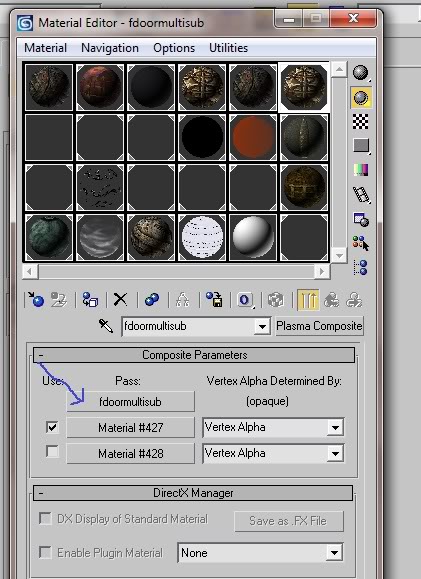
| + | # [[Media:Stenciltut13.jpg|Click on the first pass]]. This will be your [[Media:Stenciltut14.jpg|original texture]], so ensure that it is a '''Plasma Standard''' Material and Blending is set to ''None''. | ||
| + | # Go back to the Plasma Composite Material and click on the second pass. | ||
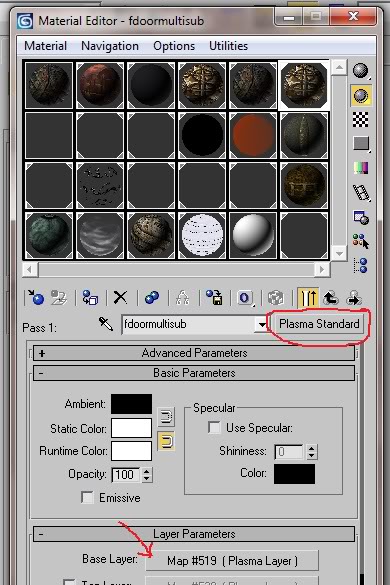
| + | # As before, make sure this pass is a '''Plasma Standard''' Material. We will be using both layers, so check ''Top''. [[Media:Stenciltut16.jpg|Turn on alpha blending.]] | ||
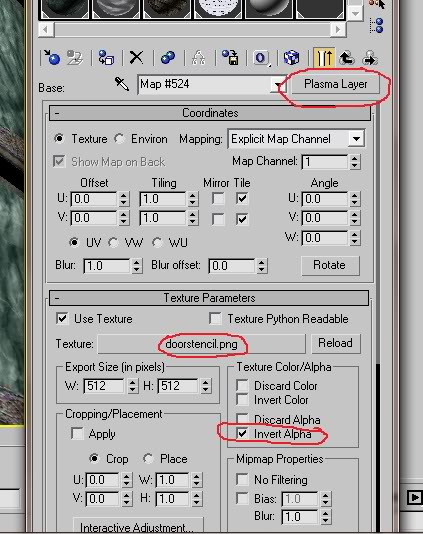
| + | # Click on the base layer in the second pass. Use your stencil for the texture here. If you want to make your object reflective, check [[Media:Stenciltut16.jpg|'''Invert Alpha''']] in the ''Texture/Color Alpha'' group. | ||
| − | + | ===Making the Object Reflective=== | |
| + | [[File:Stenciltut18.jpg|thumb|right|The resulting material]] | ||
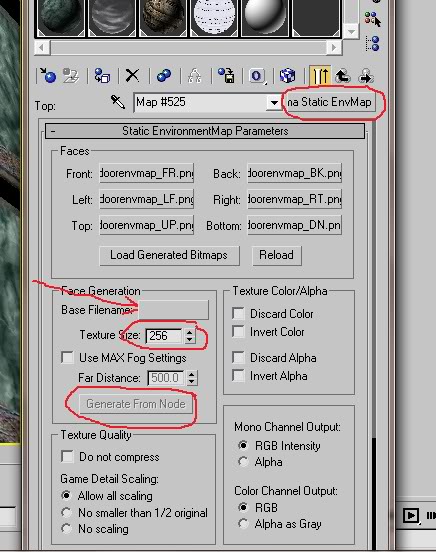
| + | # In the second pass of the Plasma Composite Material you created above, go into the top layer and change it from a '''Plasma Layer''' into a [[Media:Stenciltut17.jpg|'''Plasma Static EnvMap''']]. This is a texture generated on export that represents the environment. In other words, this is the reflection! | ||
| + | # Go down to the box labeled ''Face Generation'' and click on the blank button called says "Base Filename". | ||
| + | # Type in the name you want for you EnvMap file to be (I typed in DoorStenEnvMap.png). It looks like it wants you to pick something, but what you want to do is type in a new file name. Only use either .png or .tga extensions. With .png, a small box will pop up, asking you what properties you want for the .png file. I always just click on Ok and use the default. | ||
| + | # In the ''Face Generation'' box, there is a box for Texture Size. It defaults to 64, meaning that the exporter will generate an image that is 64 x 64 pixels. If your object is really small, or you don't care how nice the reflection is going to look, you could leave it. | ||
| + | # Click on the button that says "Generate From Node". The button will turn yellow, meaning that you need to select an object. You can either click it in the 3d Scene or select it from a list by pressing '''H'''. | ||
| + | # Max will now generate six texture faces and place them in those blank boxes. | ||
| + | # Go back to the main 2nd Pass material, and change the Opacity to something less than 100%. If you leave it at 100, your reflective part will reflect like a mirror. I set mine to about 40 and it looks good. | ||
| + | # Make sure you assign the Plasma Composite material to your object. | ||
| − | === | + | ===Troubleshooting=== |
| − | + | '''It rendered the frames, but each one that I saw was all black!'''<br /> | |
| + | A few things can cause this: | ||
| + | * You have no lighting in your Age yet, or you are only using Run Time Plasma lighting. Add some lights to light up your objects. | ||
| + | * Your object is actually enclosed in something (oops). | ||
| + | * The pivot point for your object is too far away! Reset the pivot point on your object. | ||
| − | |||
| − | + | '''I saw images, but they all looked like they were in the wrong location!'''<br /> | |
| + | Again, your pivot point for your object is far off from your actual object. Reset the pivot point | ||
| − | |||
| − | + | '''I saw images, and they are from the right point, but I don't like what I saw!'''<br /> | |
| − | + | ||
| − | + | ||
| − | + | ||
| − | + | ||
| − | + | ||
| − | + | ||
| − | + | ||
| − | + | ||
| − | + | ||
| − | + | ||
| − | + | ||
| − | + | ||
| − | + | ||
| − | + | ||
| − | + | ||
| − | + | ||
| − | + | ||
| − | + | ||
| − | + | ||
| − | + | ||
| − | + | ||
| − | + | ||
| − | + | ||
| − | + | ||
| − | + | ||
| − | + | ||
| − | + | ||
| − | + | ||
| − | + | ||
| − | + | ||
| − | + | ||
| − | + | ||
| − | + | ||
| − | + | ||
| − | + | ||
| − | + | ||
| − | + | ||
| − | + | ||
| − | + | ||
| − | + | ||
| − | + | ||
| − | + | ||
| − | + | ||
| − | + | ||
| − | + | ||
| − | + | ||
| − | + | ||
| − | + | ||
| − | + | ||
| − | + | ||
| − | + | ||
| − | + | ||
| − | + | ||
| − | + | ||
| − | + | ||
| − | + | ||
| − | + | ||
| − | + | ||
| − | + | ||
| − | + | ||
| − | + | ||
| − | + | ||
| − | + | ||
| − | + | ||
| − | + | ||
| − | + | ||
| − | + | ||
| − | + | ||
| − | + | ||
| − | + | ||
| − | + | ||
| − | + | ||
| − | + | ||
| − | + | ||
| − | + | ||
| − | + | ||
| − | + | ||
| − | + | ||
| − | + | ||
| − | + | ||
| − | + | ||
| − | + | ||
| − | + | ||
| − | + | ||
| − | + | ||
| − | + | ||
| − | + | ||
| − | + | ||
| − | + | ||
| − | + | ||
| − | + | ||
| − | + | ||
| − | + | ||
| − | + | ||
| − | + | ||
| − | + | ||
| − | + | ||
| − | + | ||
| − | + | ||
| − | + | ||
| − | + | ||
| − | + | ||
| − | + | ||
| − | + | ||
| − | + | ||
| − | + | ||
| − | + | ||
| − | + | ||
| − | + | ||
| − | + | ||
| − | + | ||
Try to pick a different Node. Sometimes you may even need to throw in a Dummy point and use it as your Node. Just remember to remove the dummy when you're done. | Try to pick a different Node. Sometimes you may even need to throw in a Dummy point and use it as your Node. Just remember to remove the dummy when you're done. | ||
| − | |||
| − | |||
| − | |||
| − | |||
| − | |||
| − | |||
| − | |||
| − | |||
| − | |||
| − | |||
| − | |||
| − | |||
| − | |||
| − | |||
| − | |||
| − | |||
| − | |||
| − | |||
| − | |||
| − | |||
| − | |||
| − | |||
| − | |||
| − | |||
| − | |||
| − | |||
| − | |||
| − | |||
| − | |||
| − | |||
| − | |||
| − | |||
| − | |||
| − | |||
| − | |||
Latest revision as of 12:49, 28 June 2016
|
|
This is a tutorial page.Versions available: PyPRP; 3ds Max; Korman. |
We use stencils in real life to paint a words or patterns on to a surface so we don't cover that entire surface. We can do the same thing with our textures when making Ages for Uru. There are many uses for stencils: you can use them to "paint" a dirt path through some grass, to put moss or grime on a stone, and to make parts of an object reflective or shiny. In this tutorial, we will make part of an object shiny.
Contents
Creating the Stencil

I use Genetica to make textures and GIMP to edit them. For example, I created a texture for my doors in my age Neolbah. It's a great texture, but I want the dark purple parts to be reflective like the classroom doors in the Neighborhood. To do this, I need to create a stencil for the dark purple parts.

- Make a new white layer. The texture should now be completely white--don't panic!
- Now we want to make our stencil, so we should lower the opacity of the white layer so that we can see both the original texture and the white layer at the same time.
- On the white layer, use the eraser tool to erase the white that is obscuring the purple grooves. This can be a time consuming process if the surface you're erasing is similar to mine.
- Once you are done, raise the opacity of the white layer back to 100%.
- Delete the original texture layer, leaving only the white stencil layer. We are left with transparent grooves in the white texture, which will become reflective in game.
- Finally, save your texture. Make sure you use the Save As option, otherwise you will overwrite your real texture with the stencil.
3ds Max
Applying the Stencil
- Load the scene and select the object that you're going to apply the stencil to.
- Open the Material Editor, select a slot, and create a new Plasma Composite Material.
- In Plasma Composite you have three passes--you can think of them as submaterials. For our stencil, we are only going to use 2 of the passes, so uncheck the third pass.
- Click on the first pass. This will be your original texture, so ensure that it is a Plasma Standard Material and Blending is set to None.
- Go back to the Plasma Composite Material and click on the second pass.
- As before, make sure this pass is a Plasma Standard Material. We will be using both layers, so check Top. Turn on alpha blending.
- Click on the base layer in the second pass. Use your stencil for the texture here. If you want to make your object reflective, check Invert Alpha in the Texture/Color Alpha group.
Making the Object Reflective

- In the second pass of the Plasma Composite Material you created above, go into the top layer and change it from a Plasma Layer into a Plasma Static EnvMap. This is a texture generated on export that represents the environment. In other words, this is the reflection!
- Go down to the box labeled Face Generation and click on the blank button called says "Base Filename".
- Type in the name you want for you EnvMap file to be (I typed in DoorStenEnvMap.png). It looks like it wants you to pick something, but what you want to do is type in a new file name. Only use either .png or .tga extensions. With .png, a small box will pop up, asking you what properties you want for the .png file. I always just click on Ok and use the default.
- In the Face Generation box, there is a box for Texture Size. It defaults to 64, meaning that the exporter will generate an image that is 64 x 64 pixels. If your object is really small, or you don't care how nice the reflection is going to look, you could leave it.
- Click on the button that says "Generate From Node". The button will turn yellow, meaning that you need to select an object. You can either click it in the 3d Scene or select it from a list by pressing H.
- Max will now generate six texture faces and place them in those blank boxes.
- Go back to the main 2nd Pass material, and change the Opacity to something less than 100%. If you leave it at 100, your reflective part will reflect like a mirror. I set mine to about 40 and it looks good.
- Make sure you assign the Plasma Composite material to your object.
Troubleshooting
It rendered the frames, but each one that I saw was all black!
A few things can cause this:
- You have no lighting in your Age yet, or you are only using Run Time Plasma lighting. Add some lights to light up your objects.
- Your object is actually enclosed in something (oops).
- The pivot point for your object is too far away! Reset the pivot point on your object.
I saw images, but they all looked like they were in the wrong location!
Again, your pivot point for your object is far off from your actual object. Reset the pivot point
I saw images, and they are from the right point, but I don't like what I saw!
Try to pick a different Node. Sometimes you may even need to throw in a Dummy point and use it as your Node. Just remember to remove the dummy when you're done.