Miscellaneous New Features in PyPRP 1.6
This page contains descriptions of a few features that were added or changed in PyPRP 1.6 and didn't warrant being put on separate pages. (If you do find better places, feel free to move them.)
Normal Recomputation
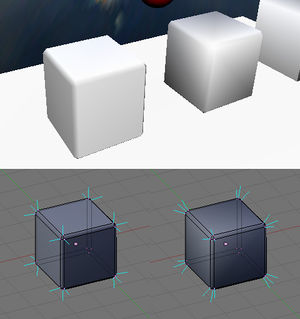
By default, exporting the mesh shown at the bottom of the image results in the look at the top right of the image: the large faces of the cube are shaded as if they were strongly curved. Enabling normal recomputation on an object, on the other hand, results in the look at the top left, much improving the appearance of objects that are supposed to have large flat faces and rounded edges (simulated by narrow bevel faces).
To enable this feature on an object, either add a logic property to the object of type String, named renormal, with value areaweighted, as shown here,
or set the visual.renormal property to areaweighted in AlcScript:
MyObject:
    visual:
        renormal: areaweighted
Background: To compute the vertex normals that are then exported by PyPRP and control the shading in Uru, Blender takes the average of the (real) normals of all adjacent faces of the vertex. This is what is shown at the bottom right of the image. In some situations, choosing different normals, as shown at the bottom left of the image, leads to better results. Unfortunately, Blender doesn't allow the user to modify the vertex normals, it just computes them using its fixed average rule. Therefore, the only way to achieve normals as on the left side is to do it in the export plugin which is free to export different normals than Blender tells it to. This is what PyPRP does when the renormal property is set. When set to areaweighted (the only currently implemented option), it averages the normals of the adjacent faces of a vertex as well, but weighted by the face area. This has the effect that large faces have a strong influence on the vertex normals, pulling them towards their real surface normals and therefore appearing flatter, while small faces have little influence and appear more curved.
Export with Modifiers Applied
In the past, if you had associated modifiers to your Blender meshes, PyPRP would ignore them and still export the unmodified mesh. To have modifiers applied, you needed to save the document, choose Apply on each modifier to bake it into the mesh, export, and revert to the saved state to get the nondestructive modifiers back. Now, PyPRP does that for you – for all objects that have modifiers, the modified mesh is exported.
Examples of useful modifiers are EdgeSplit to get sharp edges and Array for repeated objects. Keep in mind however that many modifiers make the mesh more complex and thereby reduce performance in Uru, just as if you had modeled the more complex mesh by hand. In particular, the Subsurf modifier can generate a very large number of faces, so don't go overboard with it, as tempting as it may seem to smooth your objects.
Lightmaps
It is possible to flag a layer as being part of a lightmap (in blender, this is done by pressing the "Amb" button in the material "Map To" panel). When Cyan uses lightmaps, these layers are placed in the "piggybacks" list, rather than in the main layers list (see "Material #350_Inwall_LIGHTMAPGEN" in "Ahnonay_District_LinkRoom"). PyPRP now duplicates that behavior. Judging from preliminary research, it seems to have the effect that only the texture of the lightmap layer is multiplied to the texturing and lighting from the lower layers, while for normal multiplicative layers also the lighting contributions (e.g. diffuse + preshade * vertex color) are evaluated again and multiplied to the result. Since PyPRP sets the same layer colors (runtime, preshade, ambient, specular) on all layers, these contributions end up squared in the result, darkening the image compared to the piggyback lightmap case.


