Difference between revisions of "PyPRP:Great Zero Beam"
m (→Before You Start) |
|||
| Line 10: | Line 10: | ||
You will need to determine approximately where the '''Great Zero''' is in relation to your cavern location. You are going to place a Projection Light (see [[ProjectionLights]]) at this point. So if your creation is on the cavern wall, you will need to place this light very far away for the proper effect. | You will need to determine approximately where the '''Great Zero''' is in relation to your cavern location. You are going to place a Projection Light (see [[ProjectionLights]]) at this point. So if your creation is on the cavern wall, you will need to place this light very far away for the proper effect. | ||
| − | You will also need the '''"grtzlaserproj"''' texture from either the city files or one of the Guild Pubs. For legal purposes, this texture can't be reposted here, so you must find it yourself. | + | You will also need the '''"grtzlaserproj"''' texture from either the city files or one of the Guild Pubs. For legal purposes, this texture can't be reposted here, so you must find it yourself or create an equivalent. |
== Blender Work == | == Blender Work == | ||
Revision as of 16:46, 2 October 2014
| This is a tutorial page.Versions available: PyPRP; 3ds Max; Korman. |
Contents
Introduction
This will show you how to add the beam from the Great Zero to your cavern location.
Before You Start
You will need to determine approximately where the Great Zero is in relation to your cavern location. You are going to place a Projection Light (see ProjectionLights) at this point. So if your creation is on the cavern wall, you will need to place this light very far away for the proper effect.
You will also need the "grtzlaserproj" texture from either the city files or one of the Guild Pubs. For legal purposes, this texture can't be reposted here, so you must find it yourself or create an equivalent.
Blender Work
Adding The Light
Once you have found the location you'd like to place the "Great Zero", left click on it to set the cursor there. Make sure the cursor is also slightly below your cavern location on the z-axis so the beam will encompass everything from the bottom floor up.
Next, click Add->Lamp->Area. Name this new area lamp something unique that you will remember (F9, under Links and Materials). We want this lamp facing the correct way, so press Alt+Spacebar, then click Local to switch to the lamp's local orientation. We must make sure that the local Z-Axis (blue) is facing horizontally and that the square representing the lamp's area is also facing that way.
Press R, then X, then 90, then Enter to do so if it is facing down.
Setting the Material
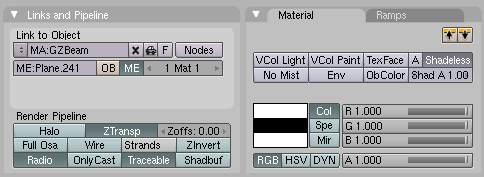
Much like footprints or ripples in water, we need to add a plane out of sight to set up a new material and texture for the beam itself. Click Add->Mesh->Plane. Once it's created and selected, press Tab, then press U, then click "Unwrap". Hit F5, then click the Material button (red ball). Add a new material and name it something unique. Make sure to turn Shadbuf OFF. Turn "ZTransp" and "Shadeless" on. Set Spec to 0 and Amb to 1.
Next, click on the texture button (to the right of the material button) and add a new texture as well, also naming it something unique. Under "Texture Type", choose "Image". Make sure MipMap, Interpol and UseAlpha are all turned on. Next, select the "grtzlaserproj" texture you recovered earlier.
Back in the Materials button, click on the "Map Input" tab and choose "Object". This should set things for now.
AlcScript for a Great Zero Beam
The code for your lamp object should be as follows:
<lamp object>:
    lamp:
        layer: <Material>-<Texture> # From your plane
        flags:
            - movable
            - OverAll
        width: 1
        height: 2000
        depth: 5000
The depth should be very big number, particularly if your lamp is very far away from your cavern location. If you're not sure, make the depth very large and keep increasing until you finally see the beam, but always keep the width at 1.
NOTE: The coding to set the light to "on" or "off" by the server with the actual Great Zero is not added to this AlcScript yet.
Animating The Light
Of course, we'll need the beam to rotate properly, and for that, we need to animate it. If you'll recall, the Great Zero rotates clockwise, so use the following directions to do that. This version assumes the GZ takes five minutes to rotate, but you can adjust the rotation time to whatever you think works. (Remember: 30 Blender frames = 1 second of animation)
Blender Animation
For more information on Blender animation basics, be sure to read the Blender 3D: Noob to Pro Wikibook's section on the subject. With that in mind, make sure your keyframe is set to 1 to start. Select your GZ light in the 3D window. Press I, then click "Rot" to record the light's position for that frame. Next, press R, then Z, then type -90 to rotate the light 90 degrees clockwise around the global Z axis. Then set your keyframe from 1 to 2250 (about 1 1/4 minutes). Press I then click Rot again to set the new rotation for this frame.
Repeat this process for frames 4500, 6750 and 9000 to make the light do a full rotation in five minutes.
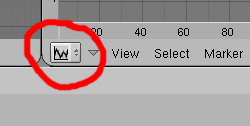
Now, if things are left like this, the animation will stall a bit at the beginning and end. To fix this, go to the IPO Curve Editor window.
You should see three lines with various points for your animation (you may need to use the mouse wheel to zoom out to see them). If you don't see anything, make sure your IPO Type is set to "Object". Keep pressing A until all the various points on the curves are selected (they'll be white instead of black). Next, press T, then 2 for a "Linear" curve to straighten out the ends and have one smooth, continuous rotation.
By default, PyPRP exports animations that play in a loop, so no more is needed here for now.
At this point, you may now export your Age! There's still more to do in PrpShop.
Fixing the Files
At this time, the only way found to make things work properly is to modify the PRP files directly. If another method is found via Blender and PyPRP, this section may become obsolete.
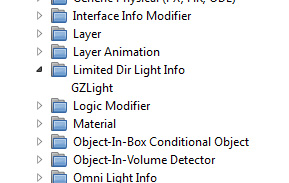
To get PrpShop, you must visit the Tools page and download PlasmaShop. Once it's installed, start the program and open the .age file of your Age. Go to the "page" with your light (mainRoom by default) and look for a folder called "Limited Dir Light Info".
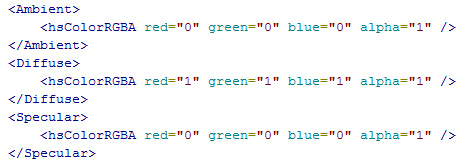
Your light should be in this folder. Right click on it and select "Edit PRC". In this, you'll find the coding for your light. Look for "Ambient", "Diffuse", and "Specular". Modify these entries until they look like the example below:
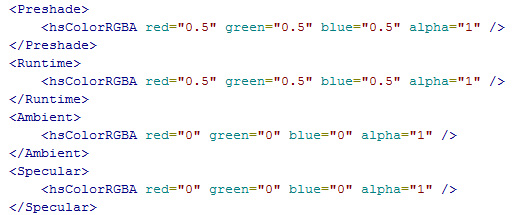
When that's done, click the "Compile and Save" button on the upper left. Next, go to the "Layer" folder and find the Material-Texture of your Great Zero beam (it will be the same as what was entered in the AlcScript). Right click on it and click "Edit PRC". This time, we're looking for "Preshade" and "Runtime" as well as "Ambient" and "Specular". Change all four of those so that they look like this:
Again, click "Compile and Save", then click the save icon near the top to save everything to the Age. Before it can work in offline URU, you must resum the Age. This is because offline URU needs a valid SUM file and we'll need to re-sum it for the Age to work properly with the changes we made.
To do this, open Plasmashop and open your Age's .sum file in with the other files. Open it and in the next window, click Re-sum, then click on the save icon. Once that's done, close PlasmaShop.
And that should do it! You should now have a working Great Zero beam in your cavern location.

