Difference between revisions of "Korman:Detail Textures"
Boblishman (Talk | contribs) m |
Boblishman (Talk | contribs) m |
||
| Line 65: | Line 65: | ||
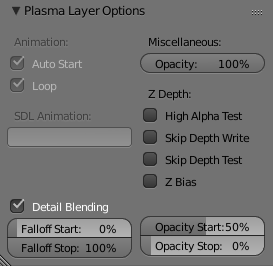
[[File:PlasmaLayerOptions_DetailBlending_FallOff.jpg]] | [[File:PlasmaLayerOptions_DetailBlending_FallOff.jpg]] | ||
| − | If you want a more detailed, technical explanation of exactly how these values work, then check out this GOW forum [https://forum.guildofwriters.org/viewtopic.php?p=73744#p73744 here] | + | If you want a more detailed, technical explanation of exactly how these values work, then check out this GOW forum post by Tsar Hoikas [https://forum.guildofwriters.org/viewtopic.php?p=73744#p73744 here] |
To see how this detail blending effect looks in game, check out this video on [https://youtu.be/MxsWGF_wKKk YouTube] | To see how this detail blending effect looks in game, check out this video on [https://youtu.be/MxsWGF_wKKk YouTube] | ||
Latest revision as of 12:43, 4 February 2020
| This is a tutorial page.Versions available: PyPRP; 3ds Max; Korman. |
Materials with "Detail Blended" texture layers are useful in avoiding textures that would otherwise be too blurry or pixelated when your avatar (or more specifically, your active camera) gets close to them, while also avoiding excessive tiling on large objects when you are very far away.
This is particularly noticeable with large areas (walls, floors, terrain) that will be seen from a distance and close up. Good UV mapping helps, but cannot completely stop this from happening with large surfaces.
Using a "detail" texture layer solves this by slowly blending one of the material's texture layers into another one, in real time, as the camera gets closer to the object. As the camera gets closer to the material, the amount of blending gets more intense until you eventually see only the "near" texture layer. The opacity of the "near" texture changes from 0% to 100% as the camera gets closer, and it does so in real-time, while the "far" texture goes from 100% to 0% opacity.
Note for former PyPRP users: The main difference between using this option in Korman from PyPRP is that your textures images do not need an alpha channel in Korman. In fact, images with no alpha give the best results.
You can use the same texture image file for both the "far" texture layer and the "near" texture layer, although you will often be using completely different images for "far" and "near". However this tutorial will use the same image for simplicity.
NOTE: This tutorial assumes you are already familiar with creating basic, single texture layer materials in Blender.
Creating the material
Create a new object, and make sure its selected in the 3D window and then:
a) In the Properties Panel, click on the Material button and add new material and rename it to something easy to remember. In this example it was renamed to "bryceisland"
b) Click the Texture button and add a single texture layer and rename it. In this example it was renamed to "rock"
c) Use a NON-transparent .png image file and then UV map it so it looks good from a distance. In this example the image file is called "aRock_.png.
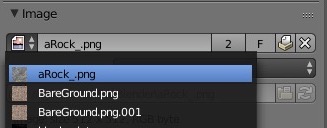
d) In the Texture Panel add a second (new) texture layer and rename it. In this example it was renamed to "rock-detail" . In the Image section, use the dropdown button and select the same texture data block, in this example "aRock_.png"
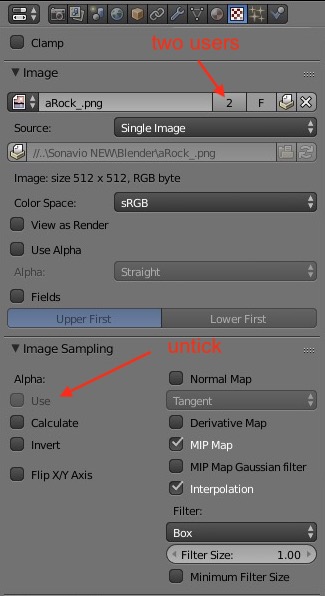
(Notice that the image now has TWO users)
e) Now, UNtick the Alpha box and your image panel should look something like this ...
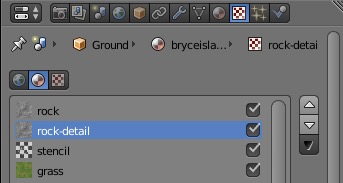
and if you scroll back up you should now have two texture layers. In this example, "rock" and "rock-detail".
... like this:
Note:In this example, 2 additional layers have been added, "stencil" and "grass", but more about that later (*see below)
(Make sure that these texture layers are ticked or Korman won't export them!)
f) Select the "detail" texture in this panel and then make sure that your 3d view window is showing the Material View
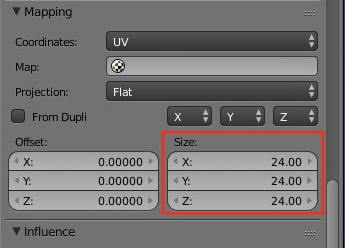
g) Scroll down to the Mapping section where the X,Y and Z values should all be be the same value, 1.
h) Check in your 3D View window and increase this number for X.Y & Z. As the value increases, you will see that the texture on the object will get smaller.
Increase this number until the texture size is mapped correctly on your object for its "close up" view in game. In this example, it was increased to 24
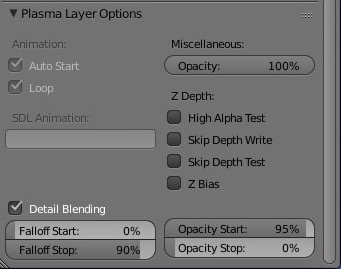
i) Now, scroll down to the Plasma Layer Options section and tick the "Detail Blending" checkbox.
j) Finally, adjust the values of FallOffStart/Stop and Opacity Start/Stop.
These values control how and when the blending from the "far away" view to the "close up" takes place in real time.
The values shown here seem to work reasonably well for most walls, cliffs and ground objects.
If you want a more detailed, technical explanation of exactly how these values work, then check out this GOW forum post by Tsar Hoikas here
To see how this detail blending effect looks in game, check out this video on YouTube
( * from above) Lastly, as mentioned before, you can add further texture layers to this material. The most commonly used extra layers for this type of material are stencils. If you want to add a stencil layer (and a subsequent completely different texture layer), then the two layers you have created here are effectively treated as one layer by the stencil. This means you will retain the detail blending and it will show through your stencil layer without any issues. In the example in this tutorial, a grass texture appears on top of the rock textures through the stencil layer. You can read the tutorial on how to create stencils textures here

