Korman:Journals
| This is a tutorial page.Versions available: PyPRP; 3ds Max; Korman. |
Journals are a good way to convey story, characters, and exposition to the explorers who find your Age. These journals can appear either as an aged and yellowed book, or as a newer notebook containing lined paper. The simple journal modifier available in Korman allows you to choose which of these your journal will use, as well as allowing you to automatically export correctly for the different versions of Uru with only a small amount of initial configuration.
Contents
Simple Journals
To create a simple journal, you will need the book object to which you will attach the modifier. Build and texture your journal's mesh and place it in your Age as you want it to appear to explorers.
With your journal object selected, go to the Properties window and select the Physics panel.
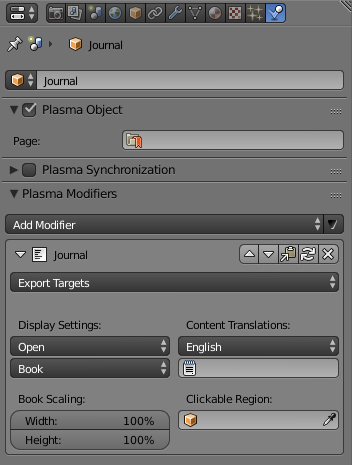
Click on Add Modifier and select Journal, found in the GUI group. The defaults should have your journal ready for export in most cases. You will only need to select the Uru version(s) to which you intend to export, and fill in the value which specifies the journal contents (see Content Options below).
The available options will change dynamically based on which Uru version(s) you select as targets in the Export Targets dropdown. You can configure as many versions as you like, and Korman will automatically use the appropriate options when you export.
Journal Book Appearance Options
These options change how the UI pop-up element of the journal is displayed to the explorer.
- Start: The start position specifies whether the book should, when clicked, start closed showing the cover, or opened and showing the first pages. If you are not providing a cover for your journal, you should use the Open option.
Applies to: Uru: Ages Beyond Myst, Myst Online: Uru Live
- Book Type: The Book Type determines the type of page that Uru will use to fill your journal. Book uses the yellowed pages, while Notebook uses the white, lined paper.
Applies to: The Path of the Shell, Myst Online: Uru Live
- Book Scaling: If you have an unusually thin or wide journal object and wish the journal UI to match it, you can scale it down in width and/or height here.
Applies to: The Path of the Shell, Myst Online: Uru Live
Content Options
Each version of Uru has a slightly different way to access journal contents. As of Korman 0.08, Korman will manage journal contents for you. To do so, you will provide a Blender text file with the journal contents. You can provide multiple translations for the journal by using the drop down.
- Language: Select the name of the language you would like to specify the journal contents for.
- Text File: Provide the text file whose contents should be used for the journal contents.
Plasma HTML
Making a journal by simply writing text in a file is ok, but there are a several options available to change the layout and appearance of your Journal's content. These can altered by adding "commands" (Plasma's version of HTML code) within the text of your Journal. These commands do not need to be in any particular order and their effect will apply to all the text that appears after them until there is a new command to change it. These commands are always placed inside angle brackets ( < >). The single set of these brackets can contain as many commands as you like, but remember, all the text that appears after those brackets will be affected by those commands.
Here is a list of commands that will help you layout your Journal's text to your liking:
Typeface Appearance:
You can use any of the fonts that are available in your dat folder. You can adjust the size and the colour. The built-in font files in your dat folder have the file extension .p2f but that file extension is NOT required by the command. Use the font's name only. For example, if you want to use the Courier font at size 20 and have it displayed in red then the code to put in your text file would be:
<face=Courier font size=20 color=ff0000>
font colour is the hexadecimal code you will find in your graphics program when you use the colour picker
Remember, ALL the text in your file that comes AFTER this command will be formatted this way until you use a new command to change it. You can add new commands at any time during your Journal's text.
For example, if you wanted most of your text to be black (000000) and just one word in red, then you would put
<face=Courier font size=20 color=000000>
at the beginning of your Journal's text and then, before the word you wanted in red you would add
<face=Courier font size=20 color=ff0000>
and then, immediately after that word, you would put
<face=Courier font size=20 color=000000>
to make the rest of the Journal's text black again.
Text alignment :
You can have the text aligned to the left, centre or right of the page using the align command:
<align=center>
Page margins :
This defines the border in pixels at which the text is written. IIRC, this works per-page and not per-line. Which means you cannot change the margin for a single line, but can change it for the full page.
<<margin left=62 right=62 top=48>>
Page Break :
This forces the Journal to make a new page for your text. For example, if you wanted each journal entry to appear on a new separate page.
<pb>
Appearance and Position of Images : (see also below)
Images can be placed into your Journal along with the text (see below). To change their position and appearance in your Journal you can use these commands:
- img src = (see below for more information on this)
- opacity = How transparent you want the image to be on the page
- blend = If your image has an alpha layer you must choose "alpha" in order for the alpha to show. This is useful for things like images that you want to look like they have been sketched into the Journal.
- align = how you want it aligned on the page
A typical command for an image that has an alpha layer and you wish to appear in the centre of the page and with an addition transparency would be:
<<img src="yourimage.hsm" opacity=0.7 align=center blend=alpha>>
Closed Book cover : (see also below)
If you want your Journal to first display as a closed book then you must put a cover image in your image library (see below) To show the cover you need to start your Journal's text file with the following command:
<cover src="yourcover.hsm">
where "your cover.hsm" is the name of your cover image file in the image library.
If you fail to include this command in your Journal text file then the Journal will first appear as open, even if you have selected the "closed" option in the modifier.
NOTE: Journal modifiers created with Korman 0.07 or lower will only be partially updated. You will have to manually provide the journal contents.
Region Options
By default, the simple journal modifier will automatically create a six-foot cubic clickable region centered around your journal's mesh.
If a special region is required for your journal, you can override this by providing your own. Simply create a region object and select it in the provided Region field.
Images
If your journal is going to contain images, either as the cover or as interior illustrations (i.e., the Minkata journal), you can use the Image Library Modifier to attach them. This modifier ensures any images it contains are exported despite having no physical presence in your Age.
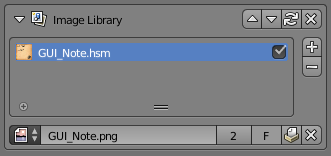
With your journal object selected, go to the Properties window and select the Physics panel. Click on Add Modifier and select Image Library, found in the GUI group. Click the + button to add a slot for the new image you wish to add to the library. Select the new slot, and from the image picker below the list, you can select either images you have already imported into Blender, or open a new file directly. Repeat adding a slot and selecting or loading an image for each new image you wish to add to the journal.
Note: The name for each image will be changed upon export; this modified name is displayed in the list's entry for each image.
When adding each image to your journal, be sure to use its name as it appears in the Image Library list. For example, if you add an image named GUI_Note.png to the library, it will be finalized as GUI_Note.hsm. Therefore, the source attribute of the image tag in your journal must use this name (e.g., <img src="GUI_Note.hsm"> ) and not the original filename, GUI_Note.png.


