Difference between revisions of "Korman:Textures"
m (→Double Sided Normals) |
m (→Double Sided Normals) |
||
| Line 181: | Line 181: | ||
==Double Sided Normals== | ==Double Sided Normals== | ||
| − | Occasionally, you'll have an instance where you'll have a flat plane but need the texture(s) on both sides. As of '''Korman 0.10''', this feature is now available. | + | Occasionally, you'll have an instance where you'll have a flat plane but need the texture(s) on both sides of the object's faces/normals. As of '''Korman 0.10''', this feature is now available. |
| − | Click on the '''Data''' button in the '''Properties''' window. Here, you'll find a checkbox for '''Double-Sided''': | + | Click on the '''Data''' button in the '''Properties''' window. Here, under the '''Normals''' panel, you'll find a checkbox for '''Double-Sided''': |
[[file:KorText16.jpg|500px]] | [[file:KorText16.jpg|500px]] | ||
Revision as of 13:22, 29 July 2020
| This is a tutorial page.Versions available: PyPRP; 3ds Max; Korman. |
This tutorial will explain various types of textures that can be used with Korman.
Contents
Introduction
Multiple textures can be layered over each other to create many desired effects. Some textures can be used as a stencil to "mix" two textures together, while others can be used to simulate lighting and shadow (aka lightmaps).
Proper UV mapping and texture settings are essential to making an object look realistic in URU. This tutorial will show you the various methods, but it's always best to adjust and experiment with the given settings to see if something works better.
Getting the Best Textures
There are many texture sites that offer free textures for use in 3D modeling. You can search the internet for "free textures" to find one that fits your purposes.
Some sites include:
More to be added
You can also go out and get a texture yourself by taking a picture of a surface of your choice. Things to remember about making your own textures:
- Make sure the surface is evenly lit (otherwise more editing may be needed later).
- Higher resolution will make the surface of your object look better.
- Good photo editing software will be needed to properly prepare your texture, particularly if you want to make it tile properly (ie smooth and continuous).
- While Korman will adjust picture size, it's best to keep your picture's dimensions in multiples of 4.
- Examples: 64 by 64, 256 by 512, 1024 by 1024, etc.
Which Types to Use
While Blender supports a wide range of image file types, generally, JPG, BMP and PNG are used.
NOTE: PNG is used for textures with alpha transparency.
All images are exported into DDS (and, in the case of images in an Image Library, HSM) format by Korman upon export.
Getting Started
Before you can add textures, be sure to add a material to the object first and modify settings to your liking.
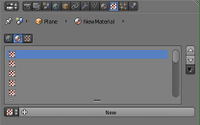
Once that's done, click on the Textures button next to the Materials button (white and red-checkered box).
The top three buttons determine where the texture will be placed. Make sure the middle one (material) is selected.
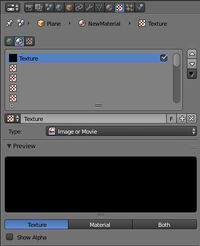
The up and down arrows to the right of the texture list can move the order of the textures in the material. Simply select a texture and use the arrows to move it up and down on the list.
Click on the New button to add our first texture.
Just above Type:, you can rename the texture to something unique if you'd like.
The checkbox next to each texture MUST be checked for Korman to export it. If you'd rather have the texture there for later, but prefer it not be exported, uncheck the box to the right of the texture.
For Type:, Korman currently uses two kinds:
- Image or Movie: uses an image file (movie files are not supported at this time)
- Environment Map: used for reflective surfaces
Image or Movie
For the time being, we'll use Image or Movie.
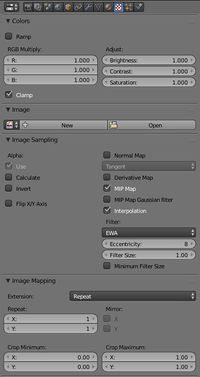
The Colors panel can adjust the settings of your texture locally (RGB value, brightness, contrast, and saturation).
The Image panel is where you can choose your image file.
For Image Sampling, make sure Use, MIP Map and Interpolation are checked. NOTE: If your image is going to be used in a Linking Book or Journal, uncheck MIP Map and Interpolation.
Image Mapping will determine if your texture is continuous or not.
- Repeat is used for a continuous texture.
- Clip is used if you'd like the texture to only appear once at the center of the UV map (decals).
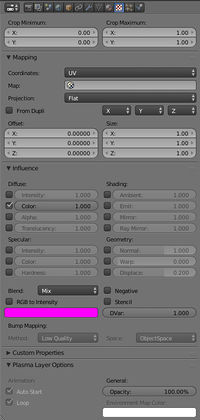
Mapping is how the texture will appear on the object. Generally, this is done with a UV map for more precise mapping. See UV mapping below.
- Select which UV map you'd like to use with the Map form. If none is selected, Korman will use the first UV map on the list.
- You can alternately use Generated in Coordinates for a continuous, yet less precise, mapping.
- Offset is mostly used in animations.
- Size is generally set at 1 for X, Y, and Z for it to appear exactly as it does in the 3D view. Increasing the value will "shrink" the texture while decreasing it will make it larger.
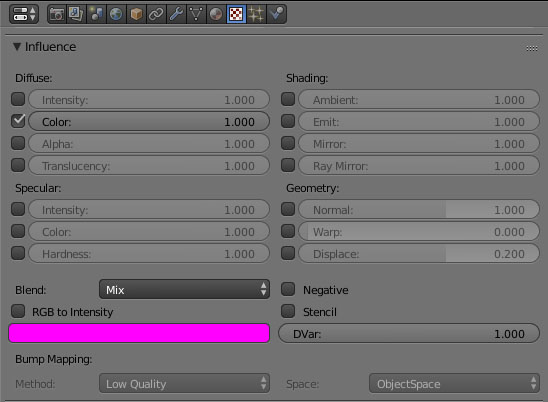
Influence is usually best with default settings. For regular textures, only Color should be checked and at a value of 1.
- Settings for this are a bit different with Stencils. See below.
- Blend is how the texture will mix with others. Generally, this is set to Mix.
- Add and Multiply are used to "merge" into a texture below based on shades of black and white.
NOTE: Multiply was used for lightmaps in PyPRP, but that method has since been replaced with Korman's lightmapping modifier.
Plasma Layer Options is a custom panel for Korman.
- You can set the behavior of your texture animations with Auto Play and Loop.
- With the opacity slider, you can set the transparency of the entire texture...and even animate it too to have it fade in and out.
- For textures which display differently depending on the avatar's distance from the object (usually used for very large object to reduce tiling), see Korman:Detail Textures.
Environment Maps
For reflective surfaces, see the Environment Map tutorial for more information.
Special Types of Textures
These are textures with special settings designed to do various functions.
Stencils
If you'd like two textures to "mix" into one another, such as the paths in Eder Kemo, a stencil is used in between two regular textures.
Generally, the stencil is black and white with shades of grey.
White will cause the texture above the stencil to appear fully over the one below it, while black will cause it to not appear at all, while various shades of grey will give the texture varying shades of blending into the lower texture.
Example
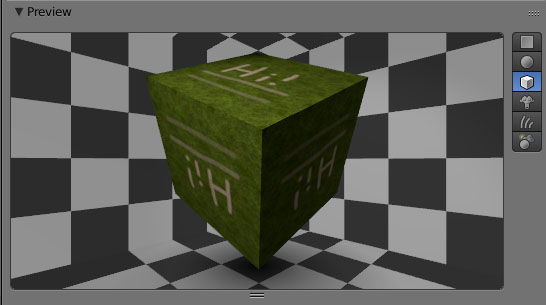
In the above example, a grass texture is used, then the stencil that will spell a path saying "Hi!", then a sand texture stenciled over the grass in the shape of the stencil.
Note that a vast majority of your textures will have these settings in the Influence panel:
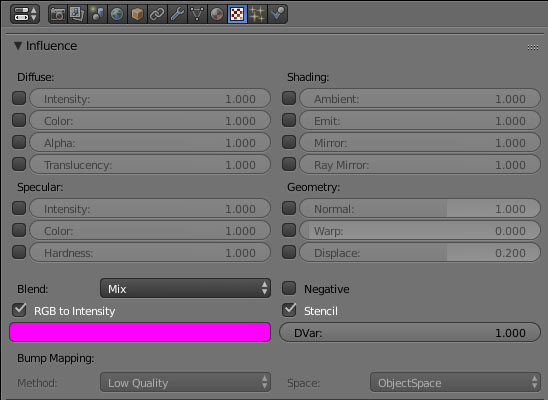
However, for your stencil texture, the settings under Influence should look like this:
Simply uncheck the Color field, then check RGB to Intensity and Stencil.
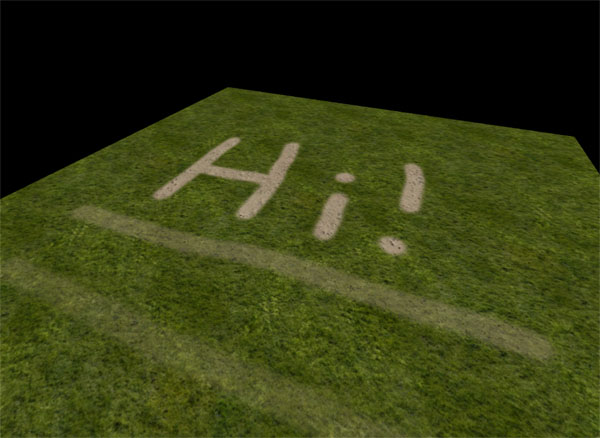
Here is the finished example in URU:
As you can see, the part of the texture that was all white makes the sand appear fully while the two lower lines below, as shades of grey, blend into the grass below.
Texture Paint
While using a pre-made black and white texture for a stencil is OK, being able to paint your stencil using the mesh in the 3D window will give you a much more accurate result.
Before you can use the Texture Paint function on a mesh, you only need to unwrap the mesh. Note you'll need a material and texture slots later, but for now, a UV map is all you need.
Once those are done, in the 3D View Window, switch to Texture Paint.
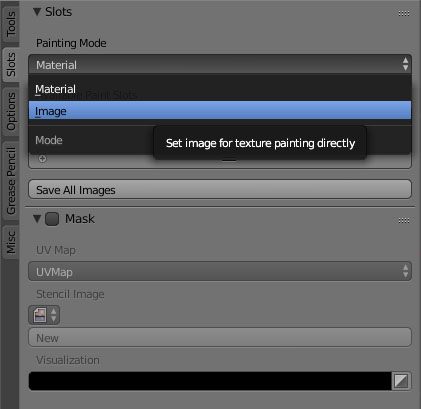
You'll see a new window appear within the 3D View with some tabs. Choose the Slots tab.
While in this tab, under Painting Mode, switch to Image.
This should bring up a new set of options. Here, you'll be able to create a new image for your stencil AND which UV map you'd like to use for it.
It's recommended you use a UV map that encompasses the entire mesh into the grey square in the UV/Image Editor window, as the image you'll be painting will generally be set within this square.
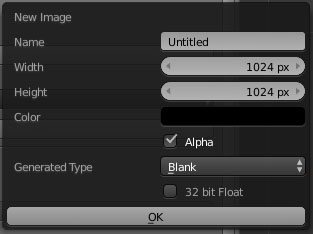
Click on New to create a new image:
You can name the file here and make this image any size you wish. Remember that the higher the resolution, the finer the detail of the stencil!
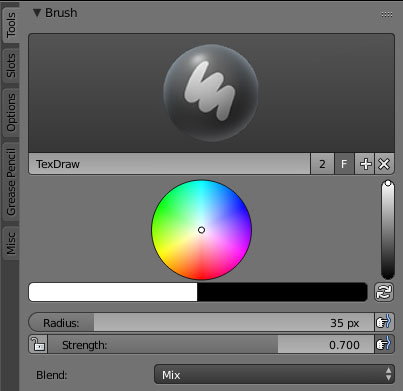
From here, click on the Tools tab in the 3D View window. You'll see a couple of options:
Generally, you only need to keep an eye on three things: Brush Color, Radius, and Strength.
Brush Color is the color that will paint to the texture. For stencils, keep this white, black, or a shade of grey.
Radius determines the size of your "brush".
Strength determines the transparency of your "paint". 1 is for the full color while 0.1 is only a small touch of color.
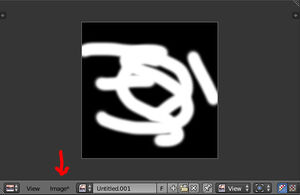
To see your work, you can switch another window to UV/Image Editor. If you look there now, you'll see this:
Note the asterisk next to Image. When you're happy with your stencil, click that and then Save as Image.
Alternately, press F3 while the mouse cursor is in the UV/Image Editor window. Save it where you like.
You now have a stencil set to your UV map! Plug it in with your other textures and see how it looks.
Double Sided Normals
Occasionally, you'll have an instance where you'll have a flat plane but need the texture(s) on both sides of the object's faces/normals. As of Korman 0.10, this feature is now available.
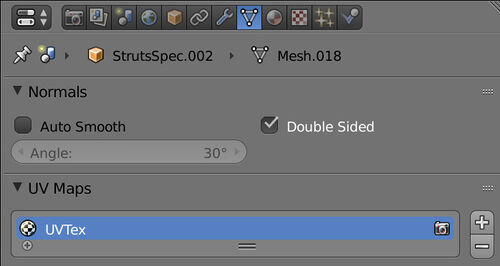
Click on the Data button in the Properties window. Here, under the Normals panel, you'll find a checkbox for Double-Sided:
Simply check this box for any flat plane objects to have the texture on either side.
NOTE: Try to use this as sparingly as possible to help performance.

