Difference between revisions of "Korman:Python Nodes"
m (→Journals) |
|||
| (8 intermediate revisions by 3 users not shown) | |||
| Line 1: | Line 1: | ||
| − | {{Tutorial}} | + | {{Tutorial|Python Nodes|Korman}} |
[[file:KorPython01.jpg|center|700px]] | [[file:KorPython01.jpg|center|700px]] | ||
| Line 20: | Line 20: | ||
[[file:KorPython02.jpg]] | [[file:KorPython02.jpg]] | ||
| − | This is the node with which you'll want to start. Click ''' | + | This is the node with which you'll want to start. Click '''Load Script''' to choose your Python script. The node will expand and add sockets for each function of the script. A copy of the full script will also be copied into your text editor for reference. Notice the different colors of the sockets when they appear. This will tell you which kinds of the following nodes will connect to that socket. |
===Boolean Attribute Node=== | ===Boolean Attribute Node=== | ||
| Line 74: | Line 74: | ||
===Journals=== | ===Journals=== | ||
| − | + | [[file:KorPython08.jpg|350px|right]] | |
<blockquote>'''NOTE:''' Journal logic has been greatly simplified with the [[Korman:Journals|Journals modifier]], but this method will still work.</blockquote> | <blockquote>'''NOTE:''' Journal logic has been greatly simplified with the [[Korman:Journals|Journals modifier]], but this method will still work.</blockquote> | ||
'''Script: xJournalBookGUIPopup.py''' | '''Script: xJournalBookGUIPopup.py''' | ||
| − | |||
| − | |||
Key: | Key: | ||
| Line 110: | Line 108: | ||
| − | [[file:KorPython10.jpg| | + | [[file:KorPython10.jpg|400px|right]] |
'''Key:''' | '''Key:''' | ||
| Line 128: | Line 126: | ||
[[file:KorPython13.jpg|300px]] | [[file:KorPython13.jpg|300px]] | ||
| − | [[file:KorPython12.jpg|300px]] | + | [[file:KorPython12.jpg|300px|right]] |
'''Key:''' | '''Key:''' | ||
| Line 165: | Line 163: | ||
<blockquote>'''NOTE''': Imagers will not work properly in Destiny if you use the '''net.linktoage''' command. To see them, you'll need to use the Nexus after the initial link (under "Personal Ages").</blockquote> | <blockquote>'''NOTE''': Imagers will not work properly in Destiny if you use the '''net.linktoage''' command. To see them, you'll need to use the Nexus after the initial link (under "Personal Ages").</blockquote> | ||
| − | |||
| − | |||
| − | |||
| − | |||
| − | |||
| − | |||
| − | |||
| − | |||
| − | |||
| − | |||
| − | |||
| − | |||
| − | |||
| − | |||
| − | |||
| − | |||
| − | |||
| − | |||
| − | |||
| − | |||
| − | |||
| − | |||
| − | |||
| − | |||
| − | |||
| − | |||
Latest revision as of 18:18, 13 November 2024
| This is a tutorial page.Versions available: PyPRP; 3ds Max; Korman. |
This tutorial will show how to utilize various Python scripts in Korman to work in URU.
Introduction
Python scripts are what make most of the more dynamic actions in URU work, such as puzzles, Linking Books, journals, and more. Cyan has provided many default scripts to choose from for most common functions, but some instances will require a custom script.
In each case, a Python node in Korman will have sockets that will tell the script what it should be doing.
Types of Nodes
Python File Node
This is the node with which you'll want to start. Click Load Script to choose your Python script. The node will expand and add sockets for each function of the script. A copy of the full script will also be copied into your text editor for reference. Notice the different colors of the sockets when they appear. This will tell you which kinds of the following nodes will connect to that socket.
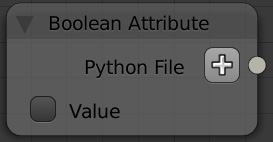
Boolean Attribute Node
Use this socket to set boolean functions of a script (true or false). Checking the box once it's connected will set the value to "true".
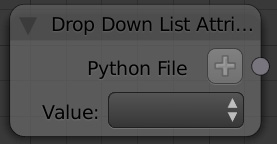
Drop Down List Node
This node controls any drop down menu function of a Python script.
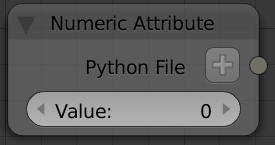
Numeric Attribute Node
This node will set a numeric value for the connected socket.
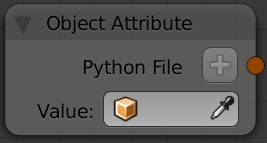
Object Attribute Node
This node is used to reference an existing object in the blend file.
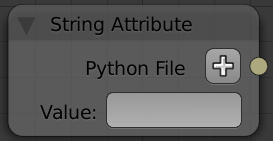
String Attribute Node
This node creates a string value (regular text) for the socket.
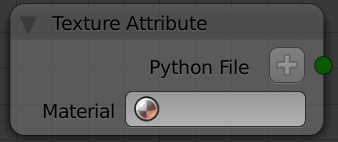
Texture Attribute Node
This node will reference a specific material and one of its textures for the script.
Other Nodes
You may also need to use region sensor, clickable, and responder nodes for some scripts.
Cyan Global Scripts
First, you will need Cyan's Python scripts. You can find them in the moul-scripts repository.
Unzip this archive and export it into it's own folder, preferably an easy place you'll remember later. You can bookmark the location in Blender's file-selection dialog for easier future access.
NOTE: PLEASE DO NOT MODIFY THESE SCRIPTS. Not only may it break some functions with your Age, they are used extensively by the entire game and you may break other Ages as well.
For a reference on more commonly-used scripts, see the Global Python Scripts page. Most basic logical actions you need for creating puzzles can be done either with one of these scripts, or by composing several of them together, without the need to write custom logic for your Age.
Journals
NOTE: Journal logic has been greatly simplified with the Journals modifier, but this method will still work.
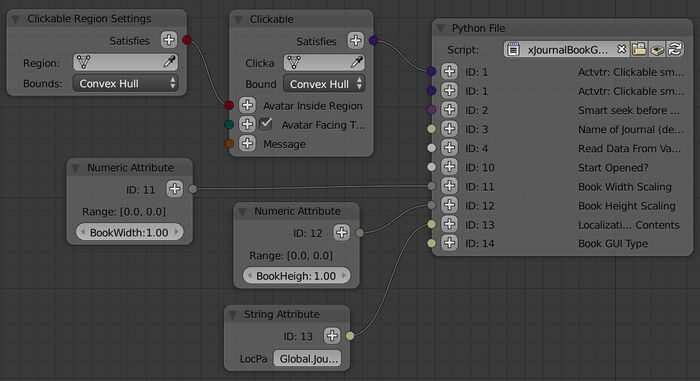
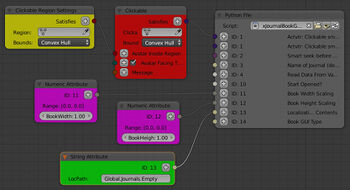
Script: xJournalBookGUIPopup.py
Key:
- Red node: your journal clickable object
- Yellow node: the clickable region where the clickable is active
- Purple nodes: the numeric nodes that determine a book's width and height (between 0 and 1.0)
- Green node: The location of the journal in your LOC file (see example below)
The Book GUI Type uses a String node. In the text field, type bkBook for regular book pages and bkNotebook for notebook pages. If this isn't set, it will use bkBook by default.
You'll need to create a LOC file with PlasmaShop, using what you entered into the green node.
LOC file example:
NOTE: The journal cover, regardless of the type of image it started as (jpg, png, etc), it will export as DDS.
The LOC file should be saved into the dat folder of your URU installation.
Imagers
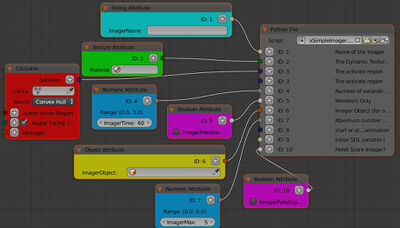
Script: xSimpleImager.py
Postable
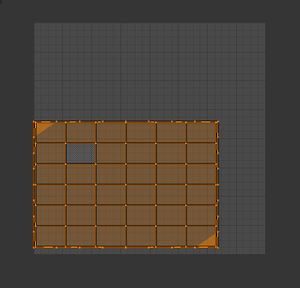
Before you start, make sure the UV mapping looks something like this for proper centering:
Key:
- Cyan node: The name of the imager that shows up in the KI
- Green node: The material and texture of the imager. The texture should be set to Type: Image or Movie and should be left empty.
- Uncheck MIP Map and Interpolation under Image Sampling in the Textures tab.
- Red node: the region an avatar enters to bring the imager up in the KI
- Blue nodes: these numerical nodes will set how long an image is on screen before it switches to the next (in seconds) and how many images the imager can hold
- For online shards, it is recommended to keep the number of images at 10 or below.
- Purple nodes: these boolean values determine if an imager is members only (keep this off or you won't be able to post) and if it can take pellet scores
- Yellow node: the imager object itself
Visitor Log
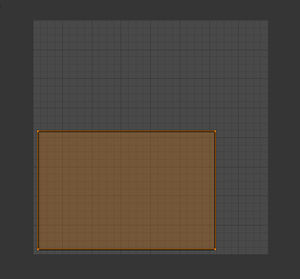
The UV mapping for a visitor imager should look like this:
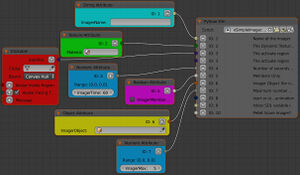
Key:
- Cyan node - The name of the imager (you'll need this for later)
- Green node - The material and associated texture of the imager. Remember to leave the texture set to Type: Image or Movie and do not add a texture
- Uncheck MIP Map and Interpolation under Image Sampling in the Textures tab.
- Red node - A placeholder for the region. Since this imager won't receive posts, you can use a dummy object for this.
- Blue nodes - These can be set to the defaults as the screen won't change. Time = 10 and Max = 5.
- Purple node - check the box for ImagerMembersOnly to further secure it from posting
- Yellow node - set this to the imager object itself
Visitor Python Scripts
For the visitor imager to work, you will also need a separate, custom Python script.
You'll need Plasmashop to create PY files. Open Plasmashop, click File->New and choose Python Script.
Copy and paste the text from the text file of the version you would like.
Modify the Files
When you have the files pasted in Plasmashop, there are a few things to change:
- Change AgeName to the filename of your Age.
- Change 99999 to your unique sequence prefix (in your World tab of your Properties window)
- Change any instances of <Imager String Name> to the name you entered in the Cyan (string) node above.
Save the modified file as YourAgeNameHere.py.
You will need UruPython 3.1 for the Path of the Shell version to pack the PY file into a PAK file.
In all versions of the game, all files should be named after your Age file and put into the Python folder of your URU installation.
NOTE: Imagers will not work properly in Destiny if you use the net.linktoage command. To see them, you'll need to use the Nexus after the initial link (under "Personal Ages").

