Difference between revisions of "Korman:Materials"
m (→Material Options) |
m (→Options) |
||
| Line 77: | Line 77: | ||
'''Full Oversampling''' and '''Sky''' are not used. | '''Full Oversampling''' and '''Sky''' are not used. | ||
| − | '''Use Mist''' will determine if an object is affected by the fog set in your Age. | + | '''Use Mist''' will determine if an object is affected by the fog set in your Age. If this is unchecked, an object with this material will appear clearly through the fog. |
'''Invert Z Depth''' can be skipped. | '''Invert Z Depth''' can be skipped. | ||
Revision as of 16:38, 9 February 2016
| This is a tutorial page.Versions available: PyPRP; 3ds Max; Korman. |
This tutorial will explain the basics of Blender 2.74's materials and how they'll export with Korman.
Contents
Introduction
Any object that you would like to be visible in Korman should have a material. If it's a region, clickable, or anything else you would rather not have visible, materials are not needed. With PyPRP, this would break the export if the object wasn't specifically set as a region or collider, but with Korman, that is not a problem.
The material of an object is essentially the base, or if you add textures, the "underbelly" of the object. If you'd prefer your object to be a solid color with no detail, you can use just a material. Otherwise, if you want textures, you start first with a material.
An object can also have multiple materials, with each one set to a specifici face (or faces) of an object if you so choose. Also, if you join two or more objects, all materials (and their mapping) are carried over, or in the case of shared materials, merged.
Materials In Blender
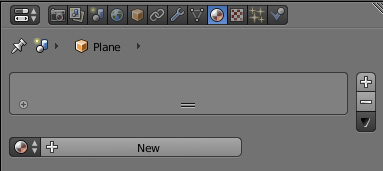
To add a material to an object, first select the Material button in the Properties window.
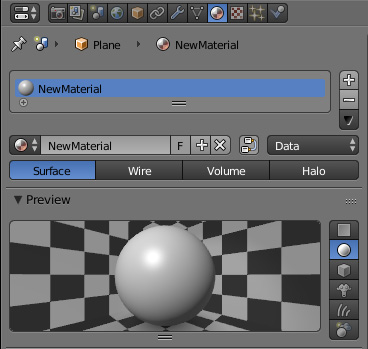
Next, press the + to add a new material. Name it anything you'd like.
Remember that you can add many materials to the same object. Each can have its own textures.
To assign specific faces to each different material, press the Tab key in 3D View to bring up Edit Mode. You will see three new buttons just below the list of materials:
- Assign: This will set any selected face to the selected material.
- Select: This will highlight any face associated with the selected material.
- Deselect: This will unhighlight any face associated with the selected material.
Press Tab again to exit Edit Mode.
Material Options
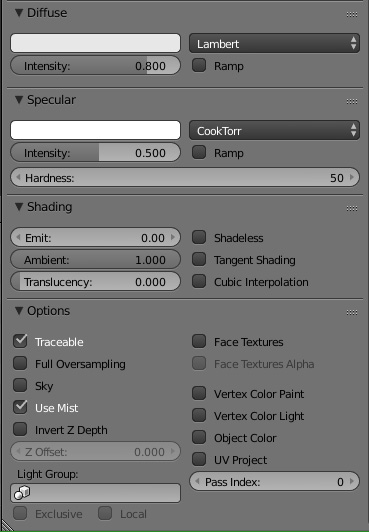
Diffuse
This is the "base" color of your object. Generally, this is set to white, but if you'd like to set your object to have a specific tint, you can change this color to something other than white.
If you'd like your material to show up a bit darker with no tint, you can use a shade of grey.
Leave Lambert alone and leave Ramp unchecked.
Specular
This option will give your object a "shine" based on your light sources. This is not the same as a reflection, but it adds a touch of realism to metallic objects.
Adjust the Intensity slider to the amount of shine you would like. 0 is no shine at all while 1 is the most intense.
Again, leave CookTorr and Ramp alone. Hardness is set to 50 by default. You can leave that too.
Shading
Emit was used in PyPRP to make a material brighter than normal. It can also be used to influence lightmaps by making the material itself a source of light. Currently, these are not implemented in Korman.
Ambient is usually set to 1 while Translucency is 0. Tangent Shading and Cubic Interpolation is not used.
Shadeless, when checked, will cause the material to be unaffected by any light source or shadows.
Options
Traceable should ALWAYS be checked.
Full Oversampling and Sky are not used.
Use Mist will determine if an object is affected by the fog set in your Age. If this is unchecked, an object with this material will appear clearly through the fog.
Invert Z Depth can be skipped.
Z Offset is used for very close-quarters objects. If two objects are overlapping, you may get clipping. You can set Z Offset to something above 0 to remedy this.
Light Group will set the material to only be affected by a certain light group during lightmapping or vertex shading.
All the check boxes to the right can be left alone (Face Textures through UV Project).
Pass Index is very important when organizing objects with transparency.
EXAMPLE: If you want transparent object A to sit above transparent object B without the alpha eating through the object below, object A should
have a higher Pass Index than object B, ie Object A = 2 while object B = 1.
Generally, new objects have a Pass Index of 0. If they're solid (no alpha), that should be fine. Otherwise, set transparent materials to Pass Index: 1 or above.
Now that our material is properly set, let's add textures!


